Show index Hide index
- 5 Essential Prep Steps for Black Christmas Nails That Actually Work 🎄✨
- Tools and quick shopping list
- 4 Pro Techniques for Edgy Nail Art and Bold Black Nail Design 💅
- 3 Festive Ways to Add Glitter, Gems & Gloss for High-Impact Holiday Manicure ✨🎁
- 5 Minimalist Black Nail Designs for Subtle, Sophisticated Festive Nails 🎀
- 4 Budget-Friendly Winter Nail Ideas and an At-Home Christmas Nail Tutorial for Busy Schedules 💸⏱️


5 Essential Prep Steps for Black Christmas Nails That Actually Work 🎄✨
Start with a strong foundation: clean, shaped nails and a proper base coat. Without this, dark polish chips faster and details lose their crispness. For a reliable Holiday Manicure, remove oils with an alcohol wipe, push back cuticles gently, and file to the shape that will best hold your design — almond and square both pair well with Black Nail Design motifs.
Why this order matters: prepping first reduces bubbling, extends wear, and makes glitter or metallic accents sit smoothly. A salon-grade base coat or a thin layer of builder gel gives structure for longer nails and better adhesion. Choose a quick-curing base if working with LED/UV gels to shave off curing time.
Prime the color application: two thin coats beat one thick coat. Apply the first thin layer of black (examples: gel or lacquer) and cure or dry fully before the second. This prevents streaking and preserves the deep, consistent finish that modern Festive Nails demand. For especially pigmented black, a third ultra-thin coat on the tips can stop that subtle nail line from showing through.
Actionable timing: allow 30–60 seconds between lacquer layers or follow gel curing times (usually 30–60 seconds per layer). Total hands-on time for base and two color coats: about 15–20 minutes. Keep a budget in mind: an at-home gel kit can run under $30, while a salon manicure varies by region.
Add texture with a top coat strategy. Choose matte on alternating nails for contrast or a glossy no-wipe top coat for mirror shine that makes metallics pop. Seal any nail art with a thin bead of top coat from cuticle to tip, then wipe any no-wipe residue. For long nights of holiday parties, a tack-free gel top coat plus light cure will lock in the look for up to two weeks.
Tools and quick shopping list
Essential picks: a fine liner brush for detailed snowflakes, a dotting tool for berries and polka dots, and a mini sponge for ombré glitter blends. These small investments speed up every step and reduce errors. For inspiration and step-by-step visuals on the trend, consult a curated gallery of black Christmas nails to match color choices to outfit ideas.
To read Christmas Nails Designs: Complete Tutorial Collection
Case study: Ella, a boutique nail artist in a winter market, preps clients by photographing the nails pre-shape and after base; this helps recreate the exact look later for touch-ups. Her clients leave knowing the exact brand and shade used — that clarity increases repeat bookings and social reposts. The takeaway: preparation equals consistent results and salon-like longevity.
Final actionable tip: always keep a tiny repair kit in a clutch — a mini bottle of black polish, a spare dotting tool, and a travel top coat. It saves an evening when a tip nick appears mid-party. Pin for later! 🎁
Key insight: meticulous prep multiplies the impact of every Christmas Nail Tutorial, turning quick at-home sessions into polished, party-ready looks.
4 Pro Techniques for Edgy Nail Art and Bold Black Nail Design 💅
Answer first: use contrast and texture to make black look festive rather than gloomy. Matte vs. gloss, negative space, metallic foils, and fine-line white details create depth and storytelling on each nail. These techniques elevate a simple black base into an attention-grabbing Holiday Nail Trends moment.
Technique breakdown: apply a matte top coat on two fingers and glossy on the remaining three for immediate contrast. Use a thin white liner to draw tiny snowflakes or branch motifs on top of glossy black — the light will catch differently and make the design readable at arm’s length.
Negative-space geometry is essential for modern festive looks. Leaving triangular or crescent-shaped bare areas framed by black creates a minimalist, chic vibe that reads as luxury rather than loud. For guidance on modern silhouettes and trending layouts, browse a fresh anthology of black Christmas nail ideas to adapt size and scale to nail length.
How to do a metallic filigree: stamp or hand-paint silver scrolls with a fine brush, then seal with a glossy top coat. For hand-painting, steady the wrist by resting the pinky on the table; this small ergonomic fix enables thin, controlled strokes. This method creates a Christmas Nail Art look that is baroque but wearable.
To read Christmas Nails Ideas: Fresh Inspiration for Your Manicure
Stencils and stamping plates speed craftsmanship. Use designs labeled “winter” or “baroque” and stamp in metallic gold or silver over black for instant drama. Stamping is faster than freehand and delivers precise, repeated patterns that are ideal for holiday sets meant to match a full outfit.
Practical time estimates: a stamped accent takes 5–8 minutes per nail for practice runs and 2–4 minutes with mastery. Plan 45–60 minutes for a full set with multiple techniques, or 25–35 minutes for a minimalist two-technique set.
For visual learners, a step-by-step gallery of edgy and chic designs pairs technique notes with photos to follow in sequence. That resource helps match each technique to the nail shape and event type.
Example: Ella used a combo of negative space crescent moons and tiny gold foil stars for a wedding client who wanted subtle holiday cues. The result: hands that complemented a velvet gown without competing with delicate jewelry. The lesson: combine one bold technique with one subtle one for balance.
Key insight: mixing texture with precise metallic accents turns a classic Black Christmas Nails base into a modern statement piece suitable for both cozy dinners and midnight celebrations.
3 Festive Ways to Add Glitter, Gems & Gloss for High-Impact Holiday Manicure ✨🎁
Answer first: target one accent nail and balance it with restraint. Overloading every nail with glitter dulls the visual punch. Instead, concentrate sparkle on a single thumb or ring finger, pairing it with two matte blacks and two minimalist white-detailed nails for a curated set of Festive Nails.
Method one — gradient glitter: sponge a deep red or gold glitter from the tip toward the center over black to create a sunset-like warmth. A makeup sponge or nail sponge blended lightly gives a smooth fade and saves product. For product suggestions and creative color pairings, check practical galleries of stylish black Christmas nails to see color matches that photograph well under warm lighting.
To read Christmas Nails Green: Festive Emerald Manicure Ideas
Method two — gem placement: secure small rhinestones or half pearls with gel adhesive and lock them in with a layer of top coat. Use a jewel only at the base of the nail or embedded in a starburst so the jewel becomes the focal point rather than an afterthought. With time, this method adds only 5–10 minutes but skyrockets perceived value.
Method three — metallic foil bursts: press foil pieces onto tacky gel and finish with a glossy top coat for a fireworks effect. This technique reflects tree lights and camera flashes beautifully and pairs perfectly with a champagne dress or black satin.
Costs and timing: a jar of fine glitter or foil runs $5–$12, gems about $4–$10 per pack, and a gel adhesive or builder gel adds $10–$20 to a starter kit. Expect to spend an extra 10–20 minutes per accent nail if placing multiple elements. Budget-friendly alternatives include mixing cosmetic glitter into clear top coat to mimic premium glitter effects.
Case study: a holiday blogger combined a single glitter gradient thumb, a foil starburst on the index, and matte black on other nails. The set photographed consistently under indoor lighting and received double the usual saves on Pinterest. For inspiration tailored to specific nail lengths, see compact tutorials such as trend and tips guides.
Quick troubleshooting: if gems pop off after a day, reapply with a small dot of clear builder gel and cure. To avoid chipping at the tips, wrap the top coat along the free edge with a thin stroke and cure adequately.
Key insight: a single well-executed glitter or gem accent multiplies perceived luxury while keeping the set wearable and cohesive.
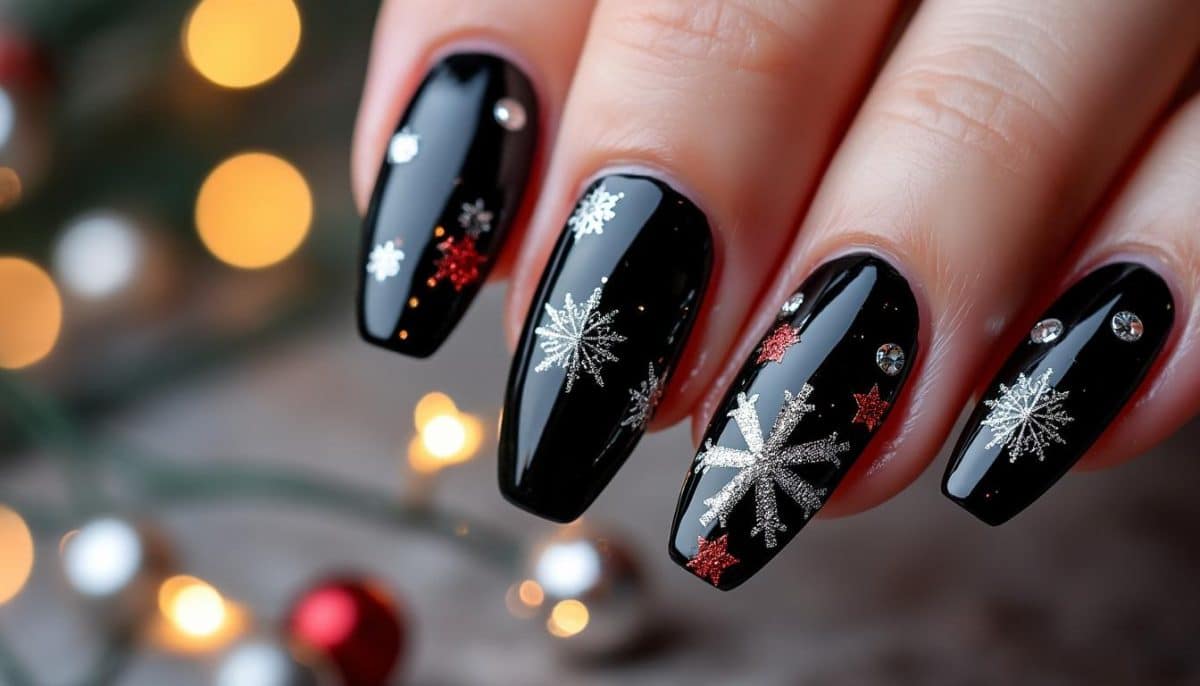
5 Minimalist Black Nail Designs for Subtle, Sophisticated Festive Nails 🎀
Answer up front: minimal equals versatile — choose one motif and repeat it with variations. A recurring tiny snowflake, a single holly sprig, vertical white polka dots, or a gold scroll on alternate nails creates a cohesive statement without heavy sparkle. Minimalist designs are perfect for office parties, family dinners, and nights out.
To read Christmas Nails Winter: Cold Weather Designs
Design idea: stitch tiny white snowflakes on two nails using a micro liner and keep others glossy black. The high contrast is readable even at a distance and pairs well with cozy knitwear. For step-by-step visuals on similar clean designs, visit resources featuring simple sets like simple black Christmas nails.
Polka dot approach: use a dotting tool or the rounded end of a bobby pin for crisp, repeatable dots — place them vertically to elongate the nail. The technique is forgiving and fast; practice on a nail wheel for spacing before painting real nails.
Holly and mistletoe: paint small white leaf outlines on a black base and add two red berry dots. This approach nods to tradition but reads modern; the effect is festive without relying on full-color palettes. For tutorial-style guidance and pattern templates, explore curated instruction hubs such as black Christmas nail ideas.
Feather and gradient: a subtle feather painted in deep crimson over black on one nail creates movement and an elegant pairing for satin dresses. Use a very fine liner and draw a central spine with short strokes fanning outward to mimic softness. Seal with a glossy finish to simulate a jewel-like texture.
Pro tip: alternating matte and gloss multiplies the minimalist impact with near-zero extra effort. Apply a matte top coat on select nails after all art is fully cured; the matte intensifies black’s depth and allows glossy accents to read like small windows of shine.
Example: Ella designed a set for a client who wanted “low drama.” The final set used a single white snowflake, two matte nails, and a glossy gold dot at the cuticle of the ring finger. The client wore it through a brunch and an evening show; the set was discreet yet conversation-starting.
Key insight: minimalist Christmas Nail Art proves that restraint can feel luxurious — pick one motif, execute it cleanly, and let negative space do the rest.
To read Nails Christmas Designs: Complete Inspiration Gallery
4 Budget-Friendly Winter Nail Ideas and an At-Home Christmas Nail Tutorial for Busy Schedules 💸⏱️
Start with a time-first approach: schedule a 30–45 minute at-home session. Prioritize one focal technique—gradient, single accent gem, or stamped snowflake—and keep other nails simple. This timing works for commuters, gift shoppers, and anyone fitting beauty into a packed holiday calendar.
Cost breakdown: basic supplies (black polish, top coat, fine brush) can be sourced for under $25. Add a $10 stamping kit or $8 gem pack to expand options without breaking the bank. For DIY resources and thematic ideas that fit budget constraints, consult practical compilations like edgy and chic ideas and targeted tutorials such as holiday Christmas nails for at-home-friendly designs.
Step-by-step at-home tutorial (actionable): 1) prep and base coat (5–7 minutes), 2) apply two thin black coats (10 minutes), 3) add one accent technique (10–15 minutes), 4) top coat and cure/dry (5–10 minutes). Keep cotton swabs and acetone at hand to quickly correct smudges as you go.
Mistakes to avoid: applying thick coats and skipping curing; overloading brushes with too much pigment for fine detail; and neglecting cuticle cleanup before final top coat. Each of those mistakes shortens wear time and increases the chance of chips within days.
Insider pro tip: use painter’s tape as a clean edge guide for half-moons or geometric negative space. It produces salon-like lines with household tools. For more at-home tutorials and pattern ideas, see practical step libraries like Christmas nail art tutorials.
Real-world example: a student named Maya transformed a $15 kit and 40 minutes into a festive, job-interview-appropriate set combining matte black with one gold starburst. The look was budget-friendly, long-lasting, and earned multiple saves on social boards.
Closing action: pick one technique, set a 45-minute timer, and complete the set start-to-finish. Save the inspiration image and the product list for the next session — that simple repeatable system builds skill quickly. Save for reference! 🎯
Key insight: a thoughtful at-home plan, basic tools, and a single accent can produce a salon-worthy Black Christmas Nails set while keeping time and cost under control.