Show index Hide index
- 5 Easy DIY Christmas Centerpieces for Your Holiday Table That Actually Work
- Idea 1 — Simple Pine & Berry Bowl (15 minutes)
- Idea 2 — Glass Jar Snow Scene (20 minutes)
- Idea 3 — Tiered Cake Stand Candle Ring (10–25 minutes)
- Idea 4 — Minimalist Eucalyptus & Candle Runner (15 minutes)
- Idea 5 — Citrus & Spice Tower (20 minutes)
- Budget-Friendly Natural Centerpieces: Foraging, Upcycling, and Low-Cost Hacks
- Step 1 — Forage and Prep
- Step 2 — Reuse What’s On Hand
- Step 3 — Light Smart, Save Money
- Styling Ideas: Rustic, Farmhouse, and Glam Centerpieces for Every Home Decor
- Rustic & Farmhouse Blueprint
- Chic & Glam Blueprint
- Modern Minimal Blueprint
- Scaling Centerpieces: Long Tables, Small Tables, and Multi-Event Use
- Long Table Formula
- Small Table Formula
- Multi-Event Reuse Strategy
- Plan, Prep, and Execute: A Simple DIY Timeline and Supply Checklist
- 60–45 Days Out — Concept & Supplies
- 14–7 Days Out — Foraging & Prep
- 3 Days Out — Final Assembly Practice


5 Easy DIY Christmas Centerpieces for Your Holiday Table That Actually Work
Christmas hosts who want Easy DIY Table Decorations should start with one clear promise: create a beautiful focal point in under 30 minutes that sets a festive mood. This section outlines five actionable centerpiece concepts with step-by-step execution, materials, and timing so the host can assemble each idea without guesswork. 🎄✨
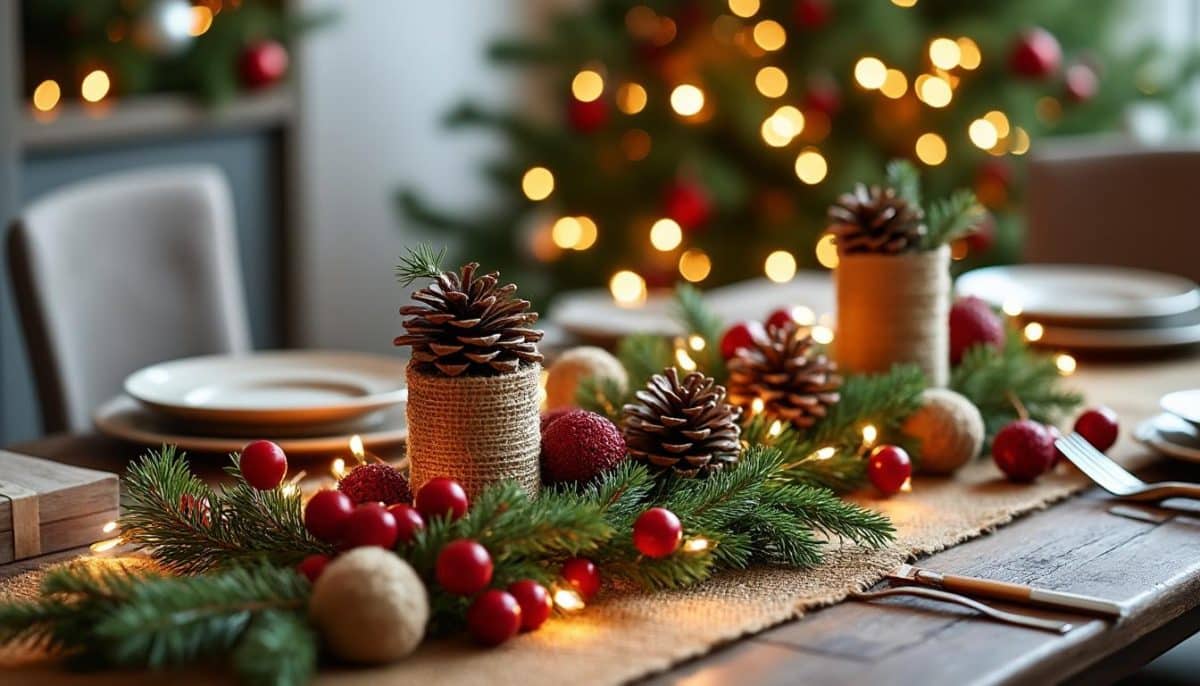
Idea 1 — Simple Pine & Berry Bowl (15 minutes)
Start with a shallow wooden bowl or thrifted tray and fill it with gathered evergreen clippings, a handful of cranberries or faux red berries, and three staggered pillar candles. Use floral foam under the candles to keep them steady if needed. The result is a rustic, budget-friendly Holiday Decor option that pairs with neutral linens.
Where to source: foraged branches, grocery-store cranberries, and thrifted trays make this project nearly free. For alternatives or visual examples, check a practical round-up of centerpiece tutorials at DIY Christmas centerpieces for table.
Idea 2 — Glass Jar Snow Scene (20 minutes)
Repurpose mason jars, add a teaspoon of Epsom salt, a battery tea light, and a miniature tree or gingerbread figure for a cozy winter vignette. Seal with a lid and wrap with burlap or ribbon to match the table palette. This Easy glass centerpiece doubles as take-home favors for guests and stays safe when using LED lights. 🕯️
Visual inspiration and variations can be found in a gallery of simple instructions at BHG DIY ideas.
Idea 3 — Tiered Cake Stand Candle Ring (10–25 minutes)
Stack cake plates or a tiered stand and build a ring of greens, pinecones, and small ornaments around pillar candles. Add battery-operated fairy lights to elevate a modest stand into a glowing centerpiece. This works for long dining tables because the tiers create vertical interest without blocking conversation lines.
To read DIY Christmas Decorations Easy: Simple Projects Anyone Can Do
Quick styling tips: limit color palette to two hues, and place weighty elements low to avoid tipping. For more tiered tray inspiration, see curated examples at Pioneer Woman ideas.
Idea 4 — Minimalist Eucalyptus & Candle Runner (15 minutes)
Lay a narrow eucalyptus garland down the table center and intersperse taper candles on brass or wooden holders. The scent adds sensory depth and the low profile keeps sightlines open. This approach excels in modern or Scandi winter tablescapes and offers easy scale adjustments for 6–12 guests.
For similar neutral and farmhouse takes, explore a variety of looks at The Spruce DIY ideas.
Idea 5 — Citrus & Spice Tower (20 minutes)
Stack cake plates with sliced oranges, whole clementines, cinnamon sticks, and cloves to build a fragrant centerpiece that feels seasonal and bright. Add sprigs of rosemary as greenery and secure with toothpicks if needed. This edible-adjacent centerpiece is great for brunch or dessert tables and keeps the house smelling like Winter.
Each idea above can be built using items already at home: bowls, vases, jars, candles, and spare ornaments. Save this set of quick projects: Pin for later! 🎯
Budget-Friendly Natural Centerpieces: Foraging, Upcycling, and Low-Cost Hacks
For hosts on a budget, the fastest path to a stunning Christmas Centerpieces display is to combine natural finds and upcycled containers. The approach requires three actions: gather free elements, choose a base, and add a light source. This produces high-impact Home Decor without big expense. 🍂💡
Step 1 — Forage and Prep
Collect pinecones, evergreen trimmings, branches, and seed pods from local parks or backyard trees. Clean pinecones with a quick oven bake at 200°F for 20 minutes to remove pests. Dry branches can be spray-painted metallic or left natural for a woodland mood.
To read Christmas Wreaths DIY: Step-by-Step Tutorial
Alternative scavenging ideas and hassle-free tutorials are shared in budget-focused roundups, such as budget centerpiece tips and creative hacks at Prudent Penny Pincher.
Step 2 — Reuse What’s On Hand
Old vases, soup tureens, wine bottles, and cake stands become charming bases. Fill with moss, pine, and a few LED lights for instant festive ambiance. Repurposing reduces waste and creates a low-cost centerpiece that looks curated.
Case study: Claire, a fictional host preparing a 10-person dinner, converted three vintage crocks and a stack of cake plates into an organic centerpiece and saved over $50 compared to buying new decor. The visual cohesion came from repeating a single accent color—deep red—across the three pieces.
Step 3 — Light Smart, Save Money
Battery-operated LED candles and string lights add warmth without fire risk. Use timers to conserve batteries and set a consistent glow for the evening. Small string lights woven through garlands create a high-end look for minimal cost. ✨
Want step-by-step photos and supply lists for natural centerpieces? Detailed guides and 20+ simple tutorials are available at 20 Super Easy Christmas Centerpieces and inspiration galleries like Southern Living.
Styling Ideas: Rustic, Farmhouse, and Glam Centerpieces for Every Home Decor
Choose a style, then limit materials to three elements to keep the centerpiece cohesive. Selecting a consistent palette—wood, green, and gold for rustic; white, silver, and glass for glam—simplifies decisions and ensures the final look fits the room. This section gives concrete styling blueprints for three popular aesthetics. 🎨
Rustic & Farmhouse Blueprint
Use wooden boxes or crates as bases and fill them with burlap-wrapped pots of evergreens, pinecones, and lanterns. Add oversized wooden candlesticks for height. This creates a warm, approachable setting that complements farmhouse tables and cozy lighting.
To read Christmas Centerpieces DIY: Budget-Friendly Table Decor
For farmhouse-specific advice and step-by-step projects, see inspirations at From House to Home and curated lists at HomeGrail.
Chic & Glam Blueprint
Opt for mirrored trays, gold candlesticks, and a tight cluster of glass ornaments. Keep greenery minimal. A single sculptural object—like a brass reindeer—anchors the arrangement and gives it a showroom finish.
Styling tip: use a neutral runner under metallic accents to reflect light and add dimension without clutter.
Modern Minimal Blueprint
Choose bottle brush trees and white ceramics, scatter a few snow-dusted pinecones, and use tapered white candles for a Scandinavian vibe. Height comes from alternating vase sizes rather than tall objects, keeping conversation lines open.
Additional modern takes and unusual color palettes can be explored in examples of colorful tablescapes at Christmas table decorations and playful palettes at Cobalt Blue and Orange (browse related entries).
Scaling Centerpieces: Long Tables, Small Tables, and Multi-Event Use
Scale centerpieces by repeating motifs rather than increasing size. For long tables, create a continuous runner of repeated elements. For small tables, concentrate a single sculptural piece to avoid overpowering the space. This section gives measurements, counts, and layout templates to execute both without stress. 📏
Long Table Formula
For tables seating 8–12, plan a continuous centerpiece that runs the length. Use 1 small swag per 2 feet of table and add votive clusters every 18–24 inches. Keep maximum height under 12 inches to preserve sightlines.
To read Christmas Ornament Crafts: Upcycling Old Decorations
Example layout: on a 10-foot table, place five greenery clusters, 12 votives, and two taller focal pieces near the center. This maintains balance and provides rhythm across the table.
Small Table Formula
For round tables of 4–6, choose a central vase arrangement or a low tray with three candles. Use symmetric placement to keep the design feeling intentional. Opt for a single color accent to avoid visual clutter.
Multi-Event Reuse Strategy
Create modular centerpieces that can be disassembled into smaller pieces for buffets, mantels, or porch decor. Use the same base materials so elements swap easily between uses. This reduces waste and stretches the holiday budget across several displays. ♻️
For curated inspiration on table settings and matching decor, reference a helpful guide on table settings at Christmas table settings and quick centerpiece ideas at Quick Christmas centerpieces.
Plan, Prep, and Execute: A Simple DIY Timeline and Supply Checklist
Start 45–60 days before the event for ambitious builds; begin one week out for quick centerpieces. This timeline prioritizes procurement, practice, and a final dress rehearsal so the table comes together without last-minute stress. The final paragraph of this section offers a motivational prompt to take action now. ✅
60–45 Days Out — Concept & Supplies
Choose a style and gather key containers and non-perishable accents. Order specialty items like unique candlesticks or glass cloches now to avoid holiday stockouts. Bookmark visual references and save them—Pin for later!
14–7 Days Out — Foraging & Prep
Collect greenery and pinecones and store them correctly (cool, dry place). Test LED lights and candles. Assemble a small mockup to verify dimensions and color harmony.
To read Christmas Centerpieces in Under 30 Minutes
3 Days Out — Final Assembly Practice
Build the centerpiece in full and photograph it for reference on the event day. Pack a repair kit: floral wire, hot glue, spare candles, and extra batteries. On the day, assemble the base, add lights, then finish with fresh greens and delicate accents last.
For printable guides and recipe-style instructions, explore a complete decor guide at Christmas table decor guide and dessert pairing ideas to coordinate with the centerpiece at Christmas dessert recipes.