
Show index Hide index
- 5 Easy DIY Christmas Ornaments That Actually Work for a Handmade Tree
- Why these ornaments beat store-bought sameness
- Step-by-step: Rustic twine ball baubles
- Quick alternatives with big payoff
- 5 Budget DIY Garland & Centerpiece Ideas Under $20 for Festive Home Decor
- Drying citrus: time, tools, and tips
- Salt dough stars and scented decor
- Centerpiece fast-assembly method
- 5 Handmade Wreath Projects to Elevate Front Door and Mantel Decor
- Pom-pom and bauble wreaths that wow
- Natural and foraged wreaths
- Hoop wreaths and mixed-material hoops
- 5 Rustic Wooden & Natural DIY Christmas Decorations for Cozy Home Decor
- Wood slice wreaths and tree collars
- Twig tabletop trees and burlap ribbon cones
- Mason jar, pomander, and lantern scenes
- 5 Quick Outdoor & Porch DIY Christmas Projects That Last Through Winter
- Vintage mailbox greenery and outdoor winter baskets
- Gnome planters, wooden gnomes, and grouping strategies
- Hula-hoop and double hoop wreaths for large-scale impact

5 Easy DIY Christmas Ornaments That Actually Work for a Handmade Tree
Main takeaway: Create stunning, personalized Christmas ornaments in minutes with common supplies; pick one technique and repeat it for a unified tree. 🎄✨
Start with one approachable method to avoid overwhelm. For fast results, choose the twine ball or botanical clear bauble approach: both require under 20 minutes and cost under $5 per ornament. These options produce consistent visual impact and are ideal for scaling to a full tree.
Why these ornaments beat store-bought sameness
Handmade ornaments add holiday personality and become keepsakes that outlast trends. A set of matching papier-mâché or painted clear glass baubles creates a designer look without the price tag. Practical tip: batch-produce five to ten identical pieces to get a store-quality finish.
Step-by-step: Rustic twine ball baubles
Conclusion first: twine ball ornaments are fast, low-cost, and kid-friendly. Use a hot glue gun, cotton twine, and small foam balls or balloon molds.
Begin by wrapping twine around a small foam ball, securing with dabs of hot glue every 2–3 inches. For an eco spin, upcycle old yarn or leftover ribbon. Time estimate: 10–15 minutes per ornament. Cost: typically under $3 each. Mistake to avoid: too much glue creates visible lumps—apply glue sparingly and smooth twine immediately.
Quick alternatives with big payoff
Papier-mâché baubles painted in metallics yield a luxury look for under $7 per ornament. Natural choices like bleached pinecones or acorn caps create a Scandinavian vibe that complements greenery. For a modern tree, fill clear baubles with dried rosemary sprigs or glitter for scent and sparkle. 🎁
To read Christmas Ornament Crafts: DIY Projects for All Ages
Use resources like curated holiday tutorials for step diagrams and themed palettes. For upcycling inspiration, the best repurpose guides are available at homemade decorations.
Practical pro tip: label storage containers with the ornament type and colorway to simplify next-year decorating. Pin for later! 📌
Key insight: Consistency in material or color produces a high-end look, even when each piece is handmade.
5 Budget DIY Garland & Centerpiece Ideas Under $20 for Festive Home Decor
Main takeaway: Transform a mantel or table with one bold garland or centerpiece that costs less than a night out—focus on texture and scent for maximum impact. 🍊🌿
Start with a single strong element like dried citrus slices or salt dough stars; these set the tone and require minimal materials. Dried citrus garlands combine visual warmth and aromatic charm while staying budget-friendly.
Drying citrus: time, tools, and tips
Conclusion first: drying citrus is a simple oven method that produces a versatile decorative element. Slice oranges, lemons, and grapefruits into 1/8–1/4-inch rounds, lay on a rack, and dry at 200°F for about 3 hours. Flip every 40 minutes for even dehydration.
Use a needle and twine to string slices alternated with bay leaves and wood beads for depth. Cost breakdown: a bag of oranges and twine can make a 6-foot garland for under $15. Warning: too-thick slices trap moisture and can mold; aim for uniform thickness.
To read Christmas Cracker Toffee: Addictive Recipe to Try
Salt dough stars and scented decor
Conclusion first: salt dough creates long-lasting shapes that can be scented and painted. Mix 2 cups flour, 1 cup salt, and 1 cup water; roll to 1/4-inch and cut stars. Bake at 200°F for 2–3 hours until hard.
Finish with essential oil drops (cinnamon or pine) and ribbon. These stars double as gift toppers and mini ornaments. For scented baubles that freshen rooms, use essential-oil diffusing felt inside clear ornaments for a two-in-one DIY solution.
Centerpiece fast-assembly method
Conclusion first: assemble a central cluster of three elements—candles, greenery, and a focal ornament—to create an instant table statement. Use a plain wreath form or a row of mason jars filled cap-down with faux berries and a votive for a quick runner.
Mason jar ideas and step photos can be found in practical roundups like easy decoration guides. Use mixed heights to add dimension and tuck in small pinecones or pomegranates for color contrast.
Key insight: One strong texture (dried citrus, salt dough, or wood beads) combined with simple greenery yields a memorable centerpiece without overspending.
5 Handmade Wreath Projects to Elevate Front Door and Mantel Decor
Main takeaway: Choose a wreath style (ornament, foliage, or fabric) and adapt it across door and mantel to unify seasonal decor. 🎀
Start with an easy base: a simple foam or wire wreath form. Attach a dominant element—pom-poms, baubles, or foraged foliage—to carry a theme across rooms. This focused approach eliminates decision fatigue and creates a consistent holiday look.
To read Christmas Table Decor: Create a Stunning Holiday Setting
Pom-pom and bauble wreaths that wow
Conclusion first: pom-pom wreaths look costly but are fast and kid-friendly. Make 30–40 pom-poms in two sizes and glue them densely around a 12-inch wreath form. For an upscale twist, alternate cream and metallic yarns and tuck in miniature bottle brush trees.
Similarly, a bauble wreath fashioned from coordinated ornaments creates mirror-like sparkle. For color inspiration, refer to seasonal galleries like curated handmade ideas.
Natural and foraged wreaths
Conclusion first: a foraged foliage wreath maximizes fragrance and lowers cost. Gather fresh pine, eucalyptus, and magnolia; wire them in small bundles to a wreath frame, overlapping for fullness. Mist with water to keep foliage fresh for longer.
This rustic approach pairs well with a simple red ribbon or a small wooden sign. For tutorials on asymmetrical foliage designs, check resources such as seasonal craft ideas.
Hoop wreaths and mixed-material hoops
Conclusion first: embroidery hoop wreaths deliver modern minimalism. Wrap a hoop partially with faux greenery and anchor a cluster of pinecones or small ornaments at one side. These hang flat and work beautifully over a mantel gallery wall.
For a more involved mixed-media build, combine burlap ribbon, painted wood slices, and small wreath tags for a farmhouse aesthetic. Use a single strong accent color to tie the look together across multiple hoops.
Key insight: Pick one wreath silhouette and customize materials and colors to achieve both front-door curb appeal and mantel sophistication.
To read Christmas Home Decor: Room-by-Room Styling Guide
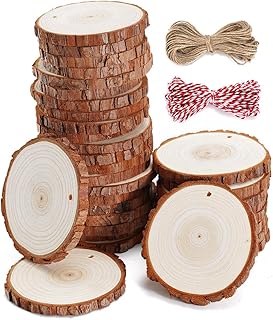
5 Rustic Wooden & Natural DIY Christmas Decorations for Cozy Home Decor
Main takeaway: Use wood slices, twigs, and pinecones to craft long-lasting rustic home decor with a modern edge. 🪵🍂
Begin by sourcing materials: inexpensive balsa wood, scrap lumber, or collected twigs. Simple wood-burning or paint accents turn humble pieces into heirloom-style items. These projects age well and fit farmhouse, Scandinavian, or modern-rustic aesthetics.
Wood slice wreaths and tree collars
Conclusion first: arranging wood slices on a wreath form produces an authentic farmhouse statement. Glue overlapping slices for texture and add a plaid bow or frosted pinecones for contrast. For a tree base alternative, repurpose a wicker basket as a DIY tree collar—measure the stand and choose a basket slightly larger for concealment.
For detailed craft inspiration and cutting patterns, see lifestyle roundups like classic craft collections.
Twig tabletop trees and burlap ribbon cones
Conclusion first: twig trees are fast to make and visually striking. Glue graduated twig lengths to a central dowel or cone base, spray lightly with metallic paint, and wrap with thin gold twine. These pieces work as shelf accents or grouped as a centerpiece trio.
Burlap ribbon trees require only foam cones and wired ribbon strips; secure with pins and add a wood bead garland for texture. These remain lightweight and store compactly for next year.
Mason jar, pomander, and lantern scenes
Conclusion first: mason jars turned upside down create charming cloche-style centerpieces. Fill jars with faux berries and a votive, then arrange along a runner for an instant mood set. For outdoor lanterns, layer faux snow, tiny figurines, and battery LEDs for safe illumination.
To read Christmas Characters: Popular Figures for Decorating
Pomanders made with dried citrus and cloves add scent and color to wreaths, baskets, and tables. For step-by-step assembly of rustic porch ideas, see outdoor decor guides and natural Christmas decor for nature-driven styling cues.
Key insight: Natural materials scale visually and emotionally—pick one material (wood, twig, or fruit) and repeat it across multiple decor elements for cohesive rustic charm.
5 Quick Outdoor & Porch DIY Christmas Projects That Last Through Winter
Main takeaway: Prioritize weatherproof materials, secure mounting, and layered textures to create a festive porch that endures snow and holiday traffic. ❄️🏡
Start planning 45–60 days ahead for sourcing fresh greenery and special supplies. Select faux greenery for longevity in exposed locations or protected fresh foliage when the porch is sheltered. Use heavy-gauge floral wire and weather-rated hooks for safety.
Vintage mailbox greenery and outdoor winter baskets
Conclusion first: repurposing items like a vintage mailbox or wicker basket produces instant curb appeal. Fill the container with birch logs, oversized pinecones, and sprigs of evergreen; secure with floral foam and add a bold buffalo-check bow.
For staging tips and visual references, review curated porch makeovers at practical DIY galleries and the themed collections at holiday house decor.
Gnome planters, wooden gnomes, and grouping strategies
Conclusion first: whimsical gnomes made from planters and dowels create height and a playful welcome. Build three sizes for visual rhythm and position the tallest on a stump or raised crate to add dimension.
Secure gnomes against wind with stakes and choose shatterproof ornaments if adding baubles. For woodland tabletop displays, group gnomes with bottle brush trees and a dusting of flocking for a magical vignette.
Hula-hoop and double hoop wreaths for large-scale impact
Conclusion first: large hoop wreaths (double or single) deliver dramatic entry statements and are surprisingly lightweight. Spray-paint hoops in metallic tones, attach faux greenery, and finish with an oversized bow for photo-ready curb appeal.
Double-check attachment points and use zip ties for secure fastening. A tutorial for hoop builds and copper finishes can spark creative variations at DIY decor templates.
Key insight: Outdoor projects benefit most from scale and reinforcement—go larger than expected and fasten thoroughly for a porch that stays picture-perfect.
Action step: Choose one project from each section and schedule two weekend sessions to complete them—first session to gather and prep, second to assemble and style. Save this guide and start crafting now. Save for reference! 📌
Martha Stewart holiday DIYs
homemade decoration inspiration
budget-friendly Christmas tips
cheap and easy decor ideas
best Christmas decoration ideas
DIY Christmas ornaments guide
Christmas centerpieces DIY
DIY Christmas decorations hub
vintage Christmas tree styling
Christmas DIY decor inspiration