
Show index Hide index
- 5 Quick Ways to Get a Stunning Emerald Manicure for Christmas Nails 🎄
- Materials, time, and budget
- Actionable step-by-step
- 5 Clever Green Nail Designs for Holiday Nail Art That Pop 📸
- Design recipes with time and cost
- Exact techniques and troubleshooting
- 5 Festive Nail Art Motifs for Christmas Nail Ideas That Are Salon-Ready ✨
- How to scale motifs for various nail lengths
- Tools, timing, and salon tips
- 5 Pro Tips to Nail Winter Nails & Holiday Nail Trends — Prep to Aftercare 🛠️
- Step-by-step professional workflow
- 5 Creative, Budget-Friendly Ways to Refresh Your Festive Manicure — DIY & Salon Hybrid Hacks 💡
- Practical refresh techniques


5 Quick Ways to Get a Stunning Emerald Manicure for Christmas Nails 🎄
Answer first: Choose a deep emerald manicure base, pick one high-impact accent (glitter, foil, snowflake, or holly), and finish with a professional top coat — that combination creates a festive, long-lasting festive manicure in under an hour. ⏱️
Why this works: a strong, single-color foundation like green nails gives visual cohesion while a single accent supplies seasonal personality without clutter. This approach is ideal for busy holiday calendars and translates perfectly into shareable pins and salon portfolios. For step-by-step visuals, check curated inspiration like emerald holiday inspo and the gorgeous green Christmas nail ideas collections for mood-board-ready looks.
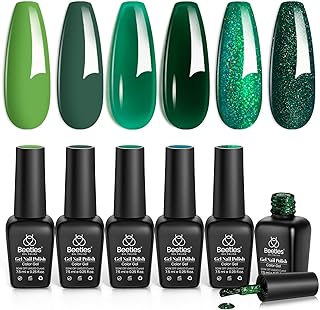
Materials, time, and budget
Start with the right tools: a rich green polish (look for names like “Off Tropic” or “Stay Off the Lawn!”), a fine liner brush, a dotting tool, and a durable top coat. Expect 35–60 minutes for a DIY session: 10–15 minutes prep, 20–30 minutes painting, 5–10 minutes curing/dry time per coat. Budget-wise, a good kit can be under $25; a salon visit ranges $35–80 depending on complexity. For reusable inspiration and quick templates, browse the green Christmas nails gallery. 💸
Actionable step-by-step
1) Prep nails: push cuticles, file into desired shape (almond or oval elongates the hand), and apply base coat. 2) Paint two thin coats of your emerald shade; thin layers dry faster and avoid streaks. 3) Choose one accent nail to highlight: glitter tip, hand-painted holly, or a metallic foil patch. 4) Seal with high-gloss or matte top coat depending on finish. 5) Apply cuticle oil within 10 minutes of curing for a salon-fresh look. These steps appear throughout curated guides like 23 green Christmas nails ideas.
Common mistakes to avoid: one thick coat (causes bubbling), painting on damp nails (peeling), and skipping top coat (loses shine and durability). Pro tip: use a sponge to feather glitter for a subtle gradient rather than full-coverage sparkle. ✨
Final practical insight: Focus on one signature element (color, texture, or motif) to make your Christmas nails feel curated and editorial — save the rest for holiday outfits. 🎁
To read Christmas Nails Designs: Complete Tutorial Collection
5 Clever Green Nail Designs for Holiday Nail Art That Pop 📸
Answer first: Combine a deep forest base with one contrasting texture — glitter, matte, foil, or stamped snowflakes — to create holiday-ready holiday nail art that photographs beautifully for Pinterest and Instagram. 📌
Why it’s effective: visually striking green nail designs rely on contrast and negative space. A single metallic accent (gold or silver) layered over emerald provides a luxe focal point that reads well in small-scale social thumbnails. For trend-led layouts and creative direction, see galleries like green Christmas nail ideas guide and editorial lists at 15 green Christmas nail ideas.
Design recipes with time and cost
Design A — Matte Evergreen Elegance: two coats of matte hunter green, one glossy glitter accent on ring finger. Time: 40 minutes. Cost: under $30 for polish set. Design B — Golden Tree Glam: emerald base, fine gold tree silhouette on accent nail using striping brush. Time: 45–60 minutes. Design C — Frosted Forest Snowflakes: ombré blend to silver chrome, hand-painted snowflakes. Time: 60–75 minutes, recommended for salons or experienced DIYers. For collections that mix playfulness and polish, peek at the mood boards on festive emerald designs. ❄️
Exact techniques and troubleshooting
Technique note: use a makeup sponge to build an ombré with micro-dabs for seamless transitions. For foil accents, apply sticky base or cured gel then press on foil flakes irregularly for a modern “worn jewelry” look. When stamping snowflakes, clean the plate and stamper between impressions to prevent smudges. If polish pools near cuticles, remove excess with a thin brush dipped in acetone and reapply a thinner coat.
Examples and quick wins: create a candy-cane accent by alternating thin red and white stripes over a nude base for a classic-to-trendy twist. Or try a half-moon negative space in gold at the base for a minimalist festive statement. Visual references and templates can be found at green Christmas nail ideas.
Final practical insight: Choose one texture to contrast with the emerald base to keep your festive nails editorial and photogenic — that’s the trick to holiday nail trends that actually drive saves. 📌
5 Festive Nail Art Motifs for Christmas Nail Ideas That Are Salon-Ready ✨
Answer first: Pick one motif — holly, snowman, reindeer, candy cane, or plaid — and adapt it across lengths to make a cohesive set of Christmas nail ideas that work for both short and long shapes. 🐾
To read Christmas Nails Ideas: Fresh Inspiration for Your Manicure
Why motifs matter: consistent iconography turns a mixed set into a story. A salon client at Evergreen Atelier might choose holly and ribbon across three nails, a glitter gradient on one, and matte forest on another; the result feels curated rather than busy. Gallery inspiration is abundant; see festive emerald designs and the detailed tips at green Christmas nails overview.
How to scale motifs for various nail lengths
Short nails: keep motifs small and centered. Use negative space to avoid crowding. Medium nails: balance a full holly scene on one nail with a glitter fade. Long nails: go bold with story nails — a multi-nail scene like a snowy slope across three nails creates drama. Always balance busy elements with plain or textured neutrals to keep the set readable from a distance.
Tools, timing, and salon tips
Essential tools: fine liner brushes, stamping plates with holiday motifs, dotting tools for berries, and micro foil flakes. Timing: holly or ribbon details add 10–20 minutes per nail depending on precision. Salon tip: pre-map the layout with a thin, washable marker to ensure composition before committing with polish.
Where to find motif templates: downloadable nail art stencils are available at many trend sites; tutorial videos and printable guides help recreate motifs at home and translate to salon briefs. For more motif-driven references, explore green Christmas nails features and practical how-tos at green Christmas nails collection. 🎨
Final practical insight: Limit to one or two motifs per hand to achieve a timeless festive manicure that reads well both in person and in photos.
5 Pro Tips to Nail Winter Nails & Holiday Nail Trends — Prep to Aftercare 🛠️
Answer first: Proper prep, layered polishing technique, and targeted aftercare extend wear and keep winter nails looking fresh across holiday events. ✨
Why it pays off: holiday schedules are packed; chips and lifts ruin photos and outfits. Real-life salon-tested protocol: prep cuticles, dehydrate nail plate lightly, apply thin base coat, two thin color coats, seal edges with top coat, and recommend nightly cuticle oil. Resources like classy Christmas nails inspiration and subtle Christmas nails options show how finish choices affect perceived quality.
To read Black Christmas Nails: Edgy Holiday Manicure Tutorial
Step-by-step professional workflow
1) Sanitize and shape: 8–10 minutes. 2) Buff lightly, wipe with alcohol or nail dehydrator. 3) One thin base coat, cure if gel — 30–60 seconds. 4) Two thin color coats, cure each. 5) Accent details: stamping, freehand, or foil. 6) Final top coat with sealed edges. 7) Oil and explain maintenance. For holiday nail art with foils or rhinestones, advise clients on gentle handling and offer a free touch-up day if possible.
Common maintenance mistakes: sleeping before full cure, using hands in harsh detergents without gloves, and skipping touch-up top coat after three days. Offer a mini aftercare card with tips and small product recommendations for retail upsell.
Resources to refine technique: step-by-step visual guides and trend roundups at Christmas acrylic nails tips and trend pages like holiday Christmas nails trends help pros stay aligned with seasonal demand. 🧤
Final practical insight: A predictable, repeatable polish ritual and clear aftercare guidance are the best investments to keep festive nails looking flawless through every holiday event.
5 Creative, Budget-Friendly Ways to Refresh Your Festive Manicure — DIY & Salon Hybrid Hacks 💡
Answer first: For a fresh holiday look without a full redo, refresh two accent nails with glitter or foil and apply a new top coat — an instant update that saves time and money. 💸
Why quick refreshes work: replacing an accent is faster than a full removal and keeps hands camera-ready for last-minute events. Affordable inspiration and step-by-step visuals can be explored at sources like gorgeous green Christmas nail ideas and the accessible collections at green Christmas nail ideas. For pocket-friendly looks and how-to lists, see 15 green Christmas nail ideas.
Practical refresh techniques
Tip A — Glitter patch: remove top coat on one nail, dab glitter into tacky layer or use clear polish as adhesive, seal with top coat. Time: 10–15 minutes. Tip B — Foil accent: apply foil glue, press foil sheet, peel, and seal. Time: 15–20 minutes. Tip C — Mini hand-paint: redraw a holly leaf and berry on the ring finger using a dotting tool and liner brush for a targeted seasonal accent. Time: 10–20 minutes.
To read Christmas Nails Winter: Cold Weather Designs
Cost breakdown examples: glitter pot $3–8, foil sheets $5–12, and polish touch-up $6–12 — total under $30 for multiple refreshes. Salon hybrid option: request a “touch-up and seal” appointment costing 40–60% of a full set. For more budget-minded inspiration, visit green Christmas nails gallery and guides at easy Christmas nails.
Creative pro tip: photograph the original manicure before alterations to map placement and symmetry for recreating the look later. Offer a “kit to go” with a small jar of matching glitter and a mini top coat for at-home touch-ups between salon visits. 🎁
Final practical insight: Small, deliberate updates to one or two nails create the biggest visual impact for the least effort — the secret to sustainable, shareable Christmas nails this season. ✨
Practical video tutorial for a glitter gradient technique above — must-watch for anyone attempting an at-home refresh. 🎥
Step-by-step motif demo — excellent for translating salon motifs into DIY-friendly versions. 🎥