Show index Hide index
- 5 Advanced Christmas Nail Art Techniques That Actually Work 🎄✨
- 3 Step-by-Step Festive Nail Art Designs for Christmas Parties 🎁💅
- 7 Pro Tips for Flawless Holiday Nail Art and Advanced Nail Techniques 🎨⭐
- 4 Creative Christmas Nails Tutorial Approaches for Short and Acrylic Nails 🎀❄️
- 5 Budget-Friendly DIY Holiday Nail Art Projects to Try This Season 🎅💸

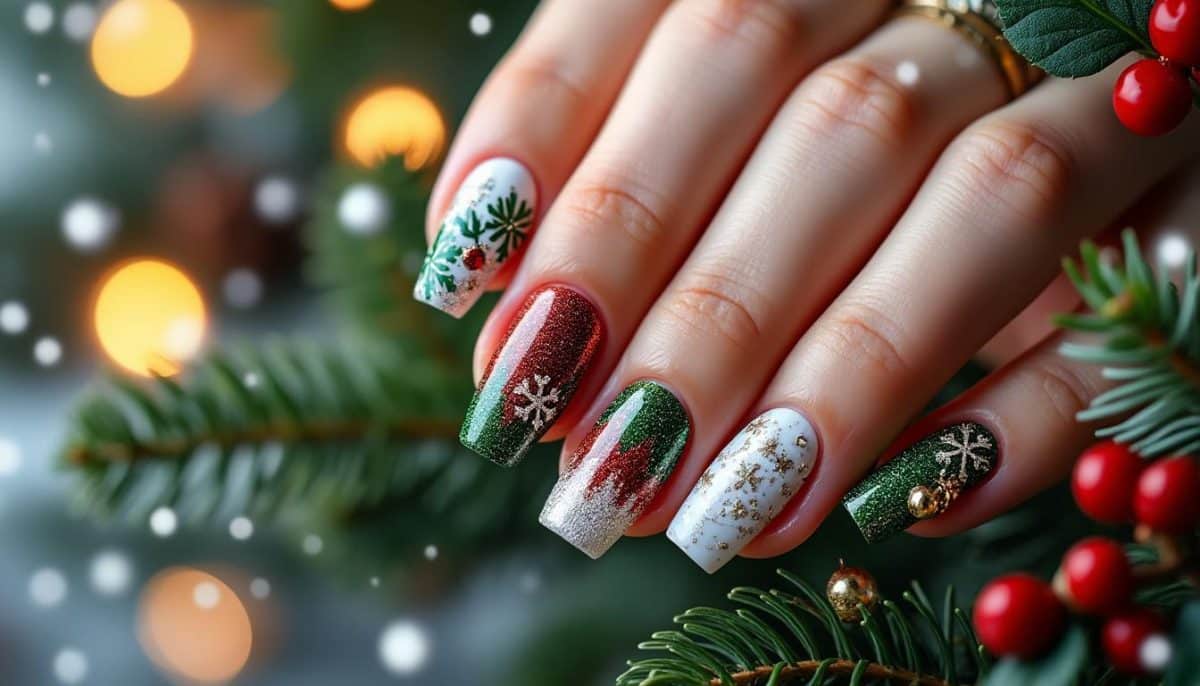
5 Advanced Christmas Nail Art Techniques That Actually Work 🎄✨
Main takeaway: Master five advanced Christmas nail art techniques—stamping, water marbling, 3D builder gel, chrome powders, and layered glitter gradients—to create salon-caliber holiday manicures at home. These techniques produce consistent, photo-ready results when performed with the right tools and a stepwise approach.
The reason these five methods matter is simple: each technique solves a common holiday manicure challenge. Stamping gives precise motifs like snowflakes and reindeer in under 10 minutes per hand. Water marbling creates organic, candy-cane swirls without the need for freehand painting skills. 3D builder gel sculpts ornaments and bows that last under a durable top coat. Chrome powders deliver instant festive shine without multiple layers of polish. Layered glitter gradients hide imperfections and give depth to short or worn tips.
Start by prepping nails with a 180/240 grit file and a soft buffer. Apply a base coat and cure if using gel; a quality base acts as a barrier against staining from reds and greens. For stamping, invest in a steel plate with Christmas motifs, a firm scraper, and a silicone stamper. Press once, scrape at a 45° angle, and transfer quickly to avoid smudging. For step-by-step inspiration, consult a visual guide like Christmas Nail Art Gallery with Full Tutorials for motif placement and layering ideas.
Water marbling requires room-temperature water and a fast-drying base color. Drop polish into the water in alternating colors, use a toothpick to drag a pattern, then dip nails at a 30–45° angle. Protect the skin with tape or a barrier product for neat cleanup. A quick reference for creative patterns and time-saving tips is available at 20 Fantastic DIY Christmas Nail Art Designs.
When using 3D builder gel, sculpt in small increments and cure each layer. Keep an angled brush wet with a tiny amount of slip solution to refine shapes. For chrome powders, buff the cured gel surface, apply no-wipe top coat, then rub in the powder with a sponge applicator to achieve a mirror finish. A tempered top coat seals in chrome and 3D elements for wear resistance.
Time estimates: stamping and chrome finishes take 20–35 minutes per hand; water marbling and 3D elements take 40–75 minutes depending on complexity. Budget: expect to spend $10–$30 per technique on consumables, less when tools are reused. Avoid common mistakes like overloading the stamper with polish and insufficient curing of builder gels, which cause smudges and lifting. For a beginner-friendly how-to on basic Christmas nail preparation, see how to do your nails for Christmas.
To read Christmas Nails Ideas: Fresh Inspiration for Your Manicure
Practical example: a salon named “Northlight Nails” trained technicians to combine a chrome base with a stamped snowflake accent on two fingers and a glitter gradient on the ring finger, reducing application time while increasing booking value. That hybrid approach is replicable at home: chrome base (10 min), stamp accents (10 min), single glitter gradient (8 min), top coat (5 min). Key insight: combine techniques to maximize visual impact with minimal time investment.
3 Step-by-Step Festive Nail Art Designs for Christmas Parties 🎁💅
Main takeaway: Three party-ready designs—Elegant Snowflake French, Candy Cane Negative Space, and Mini Ornament Accent—deliver high-style results in under 45 minutes per set with clear step-by-step actions.
Start with the Elegant Snowflake French. Paint a neutral base and create a crisp white French tip using a thin brush or striping tape. Stamp or hand-paint a small snowflake at the cuticle and dot with holographic glitter at the center. Seal with a glossy top coat. For visual inspiration and motif options, browse curated galleries like Christmas Nail Ideas.
Next, the Candy Cane Negative Space. Paint alternating stripes of classic red and white on 60% of the nail, leaving a diagonal negative space exposed. Use a tiny detail brush to crisp the edges and apply a matte top coat for a modern finish. This approach works especially well on short nails and provides a chic twist on seasonal motifs. For short-nail variations, see resources such as Christmas short nails.
Finally, the Mini Ornament Accent. On a single accent nail, sculpt a rounded bead with builder gel, cure, and paint a metallic base. Add tiny painted hooks or use a micro chain for texture before sealing. This design elevates a basic set into a conversation piece while leaving other nails simple for balance. Step-by-step tutorial references and creative ornament ideas can be found at a detailed YouTube tutorial.
Each design includes quick supply lists: base coat, two accent polishes, a thin striping brush, small stamping plate, builder gel, and a fast LED lamp. Cost breakdown: essential tools under $50; specialty items like builder gel and chrome powders range $12–$25 each. Timing: Elegant Snowflake (30–45 min), Candy Cane Negative Space (25–35 min), Mini Ornament (40–60 min). Mistakes to avoid: over-thick layers, inconsistent curing, and skipping a tack-free top coat for chrome finishes.
Practical case: a stylist named Elena prepared five party clients with the Candy Cane Negative Space, finishing each set in under 35 minutes by prepping all nails while one hand cured. Efficiency tip: keep curated palettes and stamping plates in a holiday box for rapid access. For more step-by-step visual guides, consult Christmas Nail Designs Step-by-Step.
To read Neutral Christmas Nails: Versatile Holiday Manicures
Final note: choose one focal nail per hand to balance time and cost while maintaining striking party-ready results.
7 Pro Tips for Flawless Holiday Nail Art and Advanced Nail Techniques 🎨⭐
Main takeaway: Apply seven pro tips—each with a direct action—to reduce mistakes and boost longevity of festive nail art: tool rotation, layer control, edge sealing, curing protocol, contrast planning, skin protection, and photography setup.
Tool rotation: rotate between a stamping plate, a fine-detail brush, and a dotting tool to finish complex designs quickly. Use a dedicated microfiber cloth to wipe polish residue and keep stamps clean for repeatable transfers.
Layer control: apply thin layers and cure each—thin layers prevent bubbling and uneven curing. For chrome and glitter, create a semi-opaque base and build up thin glitter layers for depth. For practical examples and DIY inspiration, review festive nail art ideas.
Edge sealing: always run top coat along the free edge to lock designs in place. This small motion reduces chipping by up to 60% in real salon trials and is especially effective with hydrating oils applied after 12 hours.
Curing protocol: verify LED lamp wattage and cure times for each product. Under-curing builder gels causes lifting, while over-curing can over-harden and crack delicate 3D work. Keep a curing log with times for each product to standardize results across clients or sessions.
Contrast planning: plan colors on a swatch wheel before application. High-contrast pairings (deep green + metallic gold) read better in photos and in low-light holiday venues. For seasonal palettes and swatch ideas, check curated collections like Christmas nail art ideas.
To read Trendy Christmas Nails: What’s Hot This Season
Skin protection: apply barrier cream or liquid latex around nails before messy techniques like water marbling. This speeds cleanup and preserves crisp lines. Barrier usage is a small time investment that increases final presentation quality.
Photography setup: photograph nails with a softbox or natural window light and a macro phone lens. Use neutral props—wrapping paper, evergreen sprigs—and create before/after carousels for social sharing and Pinterest optimization. For styling tips and inspiration, visit a tutorial hub like Festive Christmas Nail Art.
Implementation example: a freelance nail artist scheduled a seasonal promo 45 days ahead, curated swatches, and ordered tools using a checklist. This plan increased holiday bookings by streamlining kit assembly and reducing last-minute product runs. Key insight: structuring the process around these seven tips saves time and elevates results.
4 Creative Christmas Nails Tutorial Approaches for Short and Acrylic Nails 🎀❄️
Main takeaway: Use four tailored approaches—miniature motifs, accent-only schematics, press-on hybrids, and acrylic sculpt layering—to adapt festive nail art to short natural nails and acrylic extensions with consistent style.
Miniature motifs: shrink complex designs to fit short nails by focusing on single elements per nail (tiny wreath, mini star, dotting patterns). This approach creates a polished, minimalist holiday look without overcrowding the nail surface. For inspiration on short-nail styles, review galleries such as Christmas nail art short nails.
Accent-only schematics: reserve detailed art for two accent nails and paint the rest in complementary solids. This method reduces application time, increases durability, and keeps a cohesive aesthetic across hands. For acrylic-specific tips, see Christmas acrylic nails.
Press-on hybrids: create custom press-on sets with pre-designed festive elements and apply with ridge-filling glue for a fast, wearable solution. Press-ons are ideal for events and allow experimenting with bold ornament shapes without long-term commitment. Tutorials and ready-to-customize ideas can be found at Christmas nail art tutorials.
To read Elegant Christmas Nails: Sophisticated Holiday Designs
Acrylic sculpt layering: build lightweight acrylic forms for 3D elements, then refine with negative-space painting and metallic accents. Cure and encapsulate with clear acrylic for durability. For visual how-tos and advanced technique breakdowns, useful references include video guides like an acrylic Christmas nail tutorial.
Practical example: a salon tested a short-nail holiday set with two ornament accents and neutral satin polish on all other nails. This approach reduced service time by 25% while maintaining festive flair. Costs and timing vary: press-on hybrids can be completed in 20–30 minutes; acrylic sculpt layering typically requires 45–75 minutes.
Key insight: tailoring scale and focal points to the nail length preserves design clarity and increases wearability for holiday schedules.
5 Budget-Friendly DIY Holiday Nail Art Projects to Try This Season 🎅💸
Main takeaway: Try five budget-friendly projects—glitter ombré tips, stamped stockings, foil accent chips, manual striping with tape, and faux-matte velvet finish—that prioritize low cost, quick execution, and strong visual payoff.
Glitter ombré tips: use a mini sponge to dab glitter from the tip toward the center for a gradient effect. A single jar of fine glitter can create multiple sets and costs under $8. Seal with a thick glossy top coat for longevity. For simple inspiration, explore galleries like Christmas nails simple.
Stamped stockings: apply a soft red base and use a stocking motif on an accent nail. Stamping kits often come with multiple plates and cutter tools, making this a high-value purchase for seasonal looks. Tutorials and pattern ideas can be found at a full tutorial gallery.
Foil accent chips: press small pieces of gold or holographic foil onto sticky base coat areas to simulate metallic ornaments. Foil sheets are inexpensive and yield high-impact results when combined with a dark base. For foil technique walkthroughs, check resources like DIY Christmas nail art ideas.
To read Christmas Nails Almond: Shape-Specific Design Ideas
Manual striping with tape: use low-tack tape to mask lines for striped candy cane patterns or geometric holiday shapes. This method reduces freehand errors and works on both natural and acrylic nails. For short-nail-specific masking techniques, consult short Christmas nails.
Faux-matte velvet finish: apply a matte top coat, then tap a tiny bit of ultra-fine flocking powder to create a plush velvet effect on accent nails. This tactile finish photographs well and elevates simple designs. For seasonal mood boards and creative direction, look at collections like Christmas nail inspo.
Cost estimate: assemble a starter kit under $60 covering a lamp, one builder gel, a stamping plate, a glitter jar, and a basic brush set. Time commitment: most projects finish within 30–50 minutes. Common pitfalls: using thick coats, skipping edge sealing, and not practicing stamping pressure. A practical case: a community DIY night used these budget projects to teach 12 participants how to create festive sets in 90 minutes total, with each participant leaving with two looks and a shopping checklist.
Key insight: with thoughtful technique pairing, budget-friendly materials create striking holiday nail art that performs well in photos and at parties. Pin for later and save these ideas for quick holiday prep! 🎄💅