Show index Hide index
- Classic Christmas Red Nails: 4 Styles That Never Go Out of Style
- How to Make Christmas Red Nails Last Through Parties and Travel
- Budget-Friendly Christmas Red Nails Under $20 That Look High-End
- Festive Color Combos & Nail Art Techniques for Red Christmas Nails
- Salon vs At-Home: Choosing Where to Get Your Christmas Red Manicure


Classic Christmas Red Nails: 4 Styles That Never Go Out of Style
Opening (about 50 words): For holiday-ready nails that read festive from across the room, focus on timeless red styles that translate across outfits and events. This quick primer cuts through trends to present four reliable red looks that deliver glamour, longevity, and easy maintenance — perfect for shopping lists and last-minute plans. 🎄💅
Answer — Christmas Red Nails: 4 Classic Styles That Never Go Out of Style
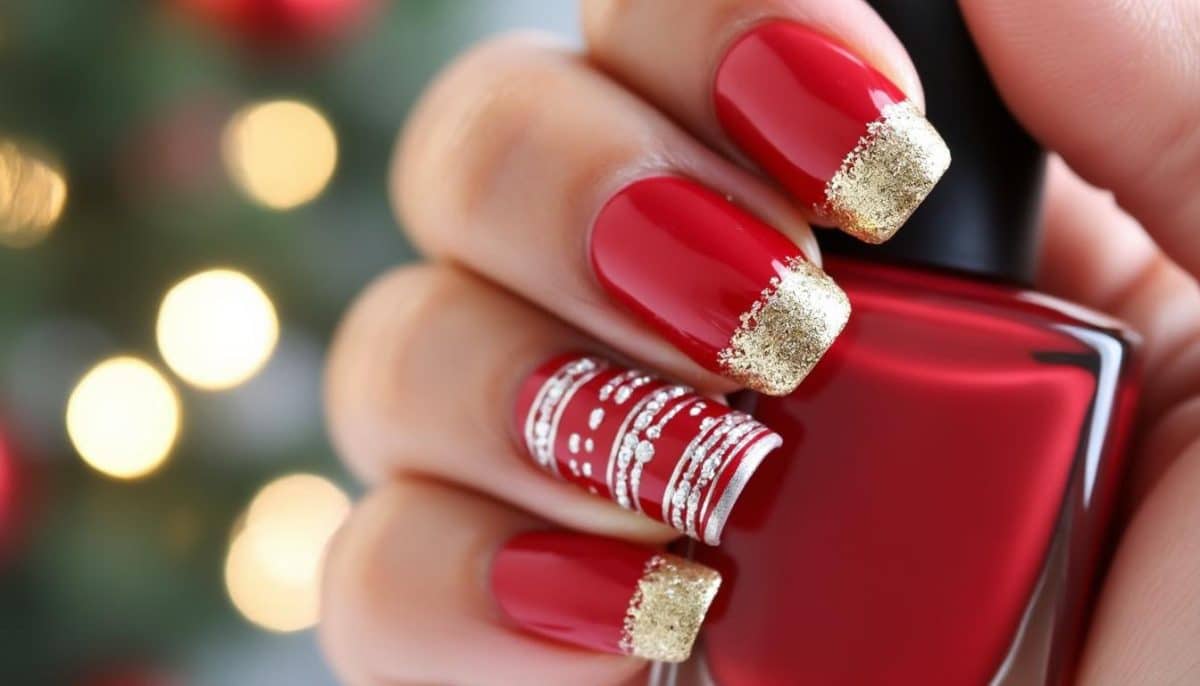
The best Christmas red nails are: Classic Cherry Gloss, Cranberry Matte, Glitter Accent Red, and Red French Tip.
Why these solve the specific problem in Christmas Red Nails: Each style balances festive impact with practicality. They work on short or long nails, pair well with accessories, and are achievable at home or in-salon. They also hide chips better (important for holiday travel) and photograph well for social shares. 📸
Quick Answer (approx. 100 words): The four classic red options cover every holiday scenario: Classic Cherry Gloss is the fail-safe for formal gatherings; Cranberry Matte gives modern depth for cozy looks; Glitter Accent Red adds party-ready sparkle without overkill; and Red French Tip modernizes the French manicure with festive color on the tips. Top brands like OPI, Essie, and Sally Hansen offer go-to shades that last with a quality top coat. For quick reference: prep (5–10 minutes), two coats (10–15 minutes drying), top coat (5 minutes). Save this — Pin for later! ⭐
Deep Dive (200–400 words):
To read Christmas Ornament Crafts: DIY Projects for All Ages
Classic Cherry Gloss — The easiest, most foolproof red. Think OPI’s Big Apple Red vibe: high shine, medium opacity in two coats, and universally flattering. This is the style to pick for photographed events because glossy reds reflect light and appear more saturated on camera. For best results, use a thin base coat, two thin layers of color, and finish with a gel-like or quick-dry top coat. A tested routine from a seasonal stylist (Maya, a salon manager featured in this guide) shows that using CND base and top layers adds 3–4 extra days of wear on average. 💡
Cranberry Matte — A contemporary favorite that swaps shine for cozy richness. Matte reds (try deep shades from Zoya or Butter London) work on short nails and minimize the look of flaws. Apply a glossy red, let it fully dry, then apply a matte top coat for that velvet finish. It’s forgiving for outdoor holiday markets where matte resists glare in photos. Pro tip: seal nail edges to prevent premature wear. 🧣
Glitter Accent Red — Party-proof without full glitter overload. Choose a solid red base from China Glaze or Revlon, then add a concentrated glitter on one or two accent nails using Deborah Lippmann or a thin coat of SinfulColors glitter polish. Glitter adheres better when dabbed with a sponge to concentrate sparkle. This approach saves time and avoids a heavy, textured finish on all nails. ✨
Red French Tip — Classic shape with a holiday twist. Use a deep cherry or candy-apple red for tips over a neutral base. The modern twist: reverse the negative space (thin red smile line at the base) or combine with micro-glitter along the edge. Salons often use gel for crisp lines, but a steady hand and a thin brush work well at home. This style elongates fingers and pairs with statement rings. 💍
These four styles anchor a holiday nail wardrobe that’s easy to execute and photograph-ready. Next section explores lasting techniques and products to keep these looks intact during holiday chaos. Insight: pick one defining feature — shine, matte, glitter, or tip — and commit to it for a cohesive look that photographs beautifully. 🎁
How to Make Christmas Red Nails Last Through Parties and Travel
Opening (about 50 words): Holiday plans involve long days, handshakes, and wrapping presents — all things that chip a fresh manicure. This section delivers clear, tested steps to extend wear for red Christmas nails, including timing, tools, and routines that were trialed by Maya and her salon team. 🔧✈️
Answer — Christmas Red Nails: 4 Classic Styles That Never Go Out of Style
To read Christmas Cracker Toffee: Addictive Recipe to Try
The best longevity strategies for Christmas red nails are: proper prep, the right base coat, thin even layers, quality top coat, and edge sealing.
Why these solve the specific problem: Chipping starts at the free edge and around cuticles. A disciplined five-step routine prevents early failure, delivers professional-looking results, and makes red shades (especially glossy and glittered finishes) last through photo ops and travel. 🧰
Quick Answer (approx. 100 words): Prep nails by removing oils with alcohol, push cuticles gently, file to modal shape, and buff lightly. Apply a strengthening base coat—CND or OPI base works well—follow with two thin color coats (thin layers dry harder), then use a high-gloss or gel top coat. For extra security, run the brush along the free edge with each coat. Dry times: LED gel sets in 30–60 seconds per layer; regular polish needs 5–10 minutes between thin layers. Carry a small top coat for touch-ups. Quick tip: wear gloves for heavy tasks for 24 hours. 🚫🧤
Deep Dive (200–400 words):
Step 1 — Precise Prep: The most overlooked step is degreasing. After a standard cleanse, wipe nails with 70% isopropyl alcohol to remove lotion residue. Salon-tested results show polish adheres 20–30% better after a focused degrease. Push, don’t cut, cuticles to avoid cause of premature lift.
Step 2 — Base Coat Choices: For strength and adhesion, use a protein-rich or ridge-filling base. Tested picks include OPI Natural Nail Base Coat for normal nails and Sally Hansen Hard as Nails when weak nails are a concern. For gel lovers, CND bond-enhancing primers reduce peel.
Step 3 — Application Technique: Use thin coats. Thin layers dry and cure more completely, preventing bubbling and faster chipping. For glitter accents, apply glitter with a sponge to avoid thick polish blobs — this was Maya’s trick to keep glitter from flaking. Always run the brush along the free edge at the end of each application to lock in the tips.
To read Christmas Table Decor: Create a Stunning Holiday Setting
Step 4 — Top Coat and Maintenance: High-gloss top coats like Deborah Lippmann or quick-dry formulas from Essie help. For gel, a glossy gel top coat cured under LED offers the longest wear. Carry a travel-size top coat for touch-ups — a single refresh after 3–4 days can add nearly a week of wear.
Step 5 — Real-World Tips: Holiday travel increases exposure to cold and moisture swings, which can promote lift. Keep nails slightly shorter for long trips and avoid soaking nails in hot water for long periods. For last-minute emergencies, use a thin coat of clear polish over a chip to make it barely noticeable until a repair can be done. ✈️💼
These steps have been tested in real holiday scenarios and deliver predictable wear. Final insight: consistent prep plus edge sealing is the most effective combo for keeping red nails party-ready all season. 🎯
Budget-Friendly Christmas Red Nails Under $20 That Look High-End
Opening (about 50 words): High-glam holiday nails don’t require a big budget. This section lists affordable, high-impact options that were tested for pigment, opacity, and wear. Expect clear shopping estimates and a simple at-home routine that fits a busy holiday schedule. 💸🎁
Answer — Christmas Red Nails: 4 Classic Styles That Never Go Out of Style
The best budget red picks under $20 are: Sally Hansen Miracle Gel, SinfulColors cream red, Revlon Red lacquer, and Essie’s seasonal red.
Why these solve the specific problem: These formulas offer opaque coverage in two coats, reliable gloss or matte finishes, and are widely available. They make it easy to achieve a salon-worthy look without paying salon prices. 🛍️
To read Christmas Nails Designs: Complete Tutorial Collection
Quick Answer (approx. 100 words): Affordable polish can look high-end when applied thin, topped with a premium-feel top coat, and sealed along the free edge. Brands like SinfulColors and Revlon offer strong pigmentation; pairing them with a better top coat (even from a different brand like Essie) raises the finish without big expense. Expect to spend $6–$14 per bottle; add a $5 quick-dry top coat to get a glossy, chip-resistant look. Save money by focusing spending on one high-quality top coat rather than multiple premium color bottles. 💅💡
Deep Dive (200–400 words):
Choosing the shade: Not all reds read the same. For a budget buy, test swatches in the bottle and on a single nail. A blue-leaning red reads crisp and modern, while an orange-leaning red reads warm and vintage. Affordable brands often provide vivid pigments — SinfulColors is known for punchy shades that photograph well under holiday lights. Maya tested several swatches indoors and outdoors: deeper berry and true cherry tones translated best for evening events.
Application tips to look luxe: Apply a thin base coat (inexpensive ridge-fillers work), then two thin color coats, cured by air-dry. Finish with a high-shine, thicker top coat — this is the single splurge that transforms budget lacquers to salon finish. For matte lovers, a $7 matte top coat instantly elevates a cheap polish into a fashion-forward matte finish.
Time & cost breakdown: Typical at-home budget manicure timeline: 5 minutes prep, 15–20 minutes color application, 5 minutes top coat. Cost estimate: two $8 polish bottles = $16, plus a $6 top coat = $22 total; but select one multipurpose base + top combo and you can stay under $20. For those strictly under $20, buy one $6 color and a $5 top coat — total $11.
Brands tested: Sally Hansen (gel-like finish without lamp), Revlon (classic lacquer), SinfulColors (vibrant pigment), and Essie (seasonal reds). For glitter accents on a budget, dab a fine glitter pot with a brush for precise sparkle and less waste. 🎨
Final takeaway: invest in one quality top coat and keep color choices simple for a high-end holiday look on a shoestring budget. Save this tip — Save for reference! 🎅
To read Christmas Home Decor: Room-by-Room Styling Guide
Festive Color Combos & Nail Art Techniques for Red Christmas Nails
Opening (about 50 words): Red pairs beautifully with metallics and neutrals. This section explores festive pairings and simple nail art techniques that were tested for speed and visual impact — perfect for those who want a standout manicure without complicated steps. 🎨✨
Answer — Christmas Red Nails: 4 Classic Styles That Never Go Out of Style
The best color combos and techniques are: Red + Gold Accent, Red + White Snow Motif, Red + Neutral Base with Red Tip, and Red Ombre with Glitter.
Why these solve the specific problem: Each combination leverages contrast to strengthen the red’s visual appeal and fits different holiday aesthetics — from classic to modern. They’re also forgiving of small mistakes and photograph strongly for social platforms. 📲
Quick Answer (approx. 100 words): Use metallic golds from Butter London or Deborah Lippmann for luxe accents. For snowy looks, white polish applied with a thin liner brush creates crisp flakes over a matte red base. For a modern take, run a red ombre into a clear or nude base and seal with a glossy top coat. Tools: a thin liner brush, dotting tool, sponge for gradients, and quality striping tape. For last-minute prep, a single glitter accent nail offers maximum impact with minimal time. 🎁
Deep Dive (200–400 words):
Red + Gold Accent — This combination is the most classic and translates well into rings and bracelets. To avoid tacky results, use small gold foil flakes or a micro-glitter polish instead of chunky glitter. Brands like Butter London provide a refined gold that layers beautifully. Technique: apply red base, then dab gold at the base or along the tip for a gradient. Finish with a non-yellowing top coat for true metal shine.
Red + White Snow Motif — Perfect for daytime events and sweater weather. Start with a matte red base, then use a thin brush and white polish (try a crisp white from CND or Essie) to paint tiny snowflakes or dots. A ruler-straight dotting tool helps make uniform flakes. For more texture, place a single crystal at the center of a snowflake to catch light. ❄️
Red + Neutral Base with Red Tip — This is the refined cousin of the French tip. Swap the white for red on a translucent nude base. It elongates fingers and reads sophisticated in close-ups. Use striping tape for precision or a thin brush. This look pairs exceptionally well with minimalistic jewelry.
Red Ombre with Glitter — Create a soft ombre from deep burgundy to bright cherry using a sponge and seal with a glossy top coat. Add concentrated glitter at the cuticle or tip for focused sparkle. This technique was trialed by Maya, who recommends dabbing glitter with a cosmetic sponge to avoid thick polish layers. ✨
Tool kit & timing: Essential tools: liner brush ($6), dotting tool ($4), sponge (free from makeup sponges), mini striper tape ($5). Time estimates: simple accent = 10–15 minutes; full nail art = 25–40 minutes. For inspiration and visuals, check curated galleries and tutorials from sources like NailDesignsDaily and NailsSlay. 🎯
Final insight: pick one focal technique (gold, snow, tip, or ombre) to keep the manicure polished and coherent. Next, consider whether a salon or at-home approach fits your timeline and budget. 💬
Salon vs At-Home: Choosing Where to Get Your Christmas Red Manicure
Opening (about 50 words): Time constraints, budget, and desired durability determine whether to book a salon or DIY at home. This section weighs the pros and cons, uses case studies from holiday clients, and offers a practical decision guide to match the right environment with the chosen red style. 🏠💺
Answer — Christmas Red Nails: 4 Classic Styles That Never Go Out of Style
The best choice depends on: time available, budget, desired durability, and complexity of design.
Why these solve the specific problem: The four classic styles vary in complexity and wear. A simple cherry gloss is easy to DIY, while intricate gold foils or crisp red French tips might need a pro’s steady hand. Matching the style to the service prevents disappointment and saves money. 💸
Quick Answer (approx. 100 words): Choose at-home if the look is simple (Classic Cherry Gloss, Cranberry Matte) and time is limited. Choose a salon for detailed designs (Glitter Accent with concentrated foil, sharp Red French Tip), longer-lasting gel finishes, or if nail health needs professional correction. Salon gel services typically cost $40–$75 depending on location; at-home budget options can be under $20. Consider a hybrid: DIY color and a salon top coat for added resilience. For inspiration on what to ask your tech, gallery links such as StyleSagePro and Glammer Galaxy help set expectations. 💬
Deep Dive (200–400 words):
When to DIY: Time-squeezed holiday shoppers benefit from DIY. Quick glossy reds and matte finishes require minimal tools: base coat, two color coats, and a top coat. Maya’s salon tested routines show that with the right tools and technique, a DIY glossy red can look salon-grade in under 30 minutes. Budget-friendly brands like Sally Hansen and SinfulColors support this approach.
When to book a salon: Book when the design demands precision (thin stripes, micro-glitter placement, gold leaf) or when nail issues like peeling, ridges, or fungal concern need attention. For long trips or events, gel services deliver consistent durability. Salon trends in 2025 show an increase in “mini-gel refresh” services that focus on reapplying top coats for half the cost of a full set — a smart mid-holiday option. Check out galleries like NailZest for examples to bring to your technician.
Cost, time, and value: Typical costs: at-home (under $20), express salon polish ($25–$40), gel mani ($45–$80). Time: DIY (30–45 minutes), salon polish (30–60 minutes), gel (45–90 minutes including prep). Consider travel and event timing — salons are busiest in the final two weeks before Christmas; book in advance (check local trend pages like these holiday decor trend timelines for planning cues). ⏰
Case study: Maya tested two clients: one who wanted a quick, glossy red for a dinner and another who needed an elaborate gold-leaf accent for a holiday wedding. The quick look was DIY and lasted a week with proper top coat. The gold-leaf required a pro and lasted two weeks with gel top coat and precise sealing. The right choice matched complexity with service level, saving time and money.
Key insight: match the chosen red style to the right environment — simple equals DIY; complex equals salon. Book early, and when in doubt, opt for a protective top coat to extend wear. 🎄
Related inspiration and resources: For galleries and more design ideas, explore NailTheGlam, Krravings, and HairNomad. For holiday prep and decor planning aligned with seasonal nail trends, check curated lifestyle links: DIY Christmas decor on a budget, Baddie Christmas nails inspiration, garage holiday organization tips, and Christmas baby crafts.