
Show index Hide index
- 5 Quick Garage Storage Fixes Under $25 — Easy Weekend DIY, Budget Results
- Pegboard Tool Wall — Why it works: fast visibility & access 🔧
- Vertical Shelves with Matching Bins — Why it works: maximizes floor space 📦
- Heavy-Duty Hook Wall — Why it works: stores bulky gear vertically 🪓
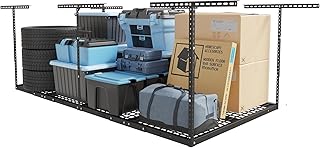
- Overhead Ceiling Rack (Mini) — Why it works: uses unused vertical real estate 🧳
- Repurpose Furniture & Label Everything — Why it works: free, customizable, keeps small items organized 🏷️


Garage clutter can feel impossible to tame — overflowing bins, loose tools, seasonal gear stacked on the floor. These five Quick Weekend DIY fixes deliver instant results without breaking the bank. Designed for homeowners, DIY beginners, and families, each project uses basic materials, a drill, level, and common basic hardware. Pin for your garage makeover! 📌
5 Quick Garage Storage Fixes Under $25 — Easy Weekend DIY, Budget Results
-
Pegboard Tool Wall — Why it works: fast visibility & access 🔧
Time: Prep 0.5 h | Build 1.5 h | Total: 2 hrs • Cost: Under $20 • Skill: Beginner
Materials:
- 4×4 or 2×4 pegboard panel
- furring strips, peg hooks (Wall Control compatible)
- Tools: drill, level, stud finder
Quick Steps: 1) Locate studs, attach furring strips. 2) Secure pegboard to strips. 3) Arrange hooks and outline tools for quick return. Safety: wear eye protection; secure heavy tools to studs. Weight capacity: ~50–75 lbs per stud-secured section.
Make it work: scale to a full 4×8 for workshops, or use Sterilite bins beneath the wall for small parts. For a sleeker look, try a Wall Control metal pegback. Insight: a visible tool map cuts project time dramatically. ⭐⭐⭐⭐☆
- 4×4 or 2×4 pegboard panel
- furring strips, peg hooks (Wall Control compatible)
- Tools: drill, level, stud finder
-
Vertical Shelves with Matching Bins — Why it works: maximizes floor space 📦
Time: Prep 0.5 h | Build 1.0 h | Total: 1.5 hrs • Cost: Under $25 • Skill: Beginner
To read Christmas Decorations That Double as Storage Solutions
Materials:
- 2×4 brackets or ready brackets (Husky/Gladiator alternatives)
- plywood shelf, Rubbermaid or Sterilite clear bins
- Tools: drill, level, screws
Quick Steps: 1) Measure for bin height (e.g., 30–50 gal). 2) Mount brackets into studs. 3) Place shelves and stack bins. Safety: anchor shelves to studs; avoid overhang. Weight capacity: 100–150 lbs per shelf with proper anchors.
Make it work: use Seville Classics wire shelving for airy storage or Ikea shelving for tighter budgets. Tip: standardize bin sizes for neat stacking. Insight: a uniform system makes seasonal swaps effortless. ⭐⭐⭐⭐☆
- 2×4 brackets or ready brackets (Husky/Gladiator alternatives)
- plywood shelf, Rubbermaid or Sterilite clear bins
- Tools: drill, level, screws
-
Heavy-Duty Hook Wall — Why it works: stores bulky gear vertically 🪓
Time: Prep 0.25 h | Build 0.75 h | Total: 1 hr • Cost: Under $15 • Skill: Beginner
Materials:
- steel utility hooks (Command/Husky style) or garage hook packs
- mounting screws into studs
- Tools: drill, level
Quick Steps: 1) Plan spacing for ladders, hoses, bikes. 2) Mark studs and mount hooks. 3) Hang items and test stability. Safety: test each hook before storing; label capacity. Weight capacity: heavy-duty hooks hold 50–100 lbs each.
Make it work: add Gladiator or Husky hooks for heavy tools; use Command outdoor hooks for temporary needs. Insight: moving bulky items up frees floor space instantly. ⭐⭐⭐⭐⭐
- steel utility hooks (Command/Husky style) or garage hook packs
- mounting screws into studs
- Tools: drill, level
-
Overhead Ceiling Rack (Mini) — Why it works: uses unused vertical real estate 🧳
Time: Prep 0.5 h | Build 1.5 h | Total: 2 hrs • Cost: Under $25 (DIY rails) • Skill: Intermediate
Materials:
- 2×4 rails, metal brackets or cheap ceiling bike hooks
- rope or ratchet straps, clear totes (Rubbermaid)
- Tools: drill, level, stud/joist finder
Quick Steps: 1) Find ceiling joists and mark. 2) Secure rails across joists with lag bolts. 3) Place bins and strap down. Safety: install into joists only; verify clearance with garage door. Weight capacity: 150–300 lbs depending on joist supports.
Make it work: for lighter budgets, suspend a simple rack for seasonal gear; for higher capacity, upgrade to Gladiator overhead systems. Insight: overhead racks double usable storage without footprint loss. ⭐⭐⭐⭐☆
- 2×4 rails, metal brackets or cheap ceiling bike hooks
- rope or ratchet straps, clear totes (Rubbermaid)
- Tools: drill, level, stud/joist finder
-
Repurpose Furniture & Label Everything — Why it works: free, customizable, keeps small items organized 🏷️
Time: Prep 0.25 h | Build 0.5 h | Total: 45 mins • Cost: Under $10 • Skill: Beginner
Materials:
- old dresser or shelves (Delta Children, Whitmor alternatives)
- small jars, coffee cans, label maker or permanent marker
- Tools: drill (for securing), basic hardware
Quick Steps: 1) Clean and prep repurposed piece. 2) Add dividers or jars for small parts. 3) Label each bin/jar clearly (add photos if needed). Safety: anchor repurposed units to wall to prevent tipping. Weight capacity: varies—secure heavy drawers to studs.
To read 8 Easy Garage Projects That Add Serious Storage
Make it work: swap clear bins (Sterilite/Rubbermaid) for visibility; paint to match garage style (Ikea hacks). Insight: labeling converts clutter into a fast, repeatable system. ⭐⭐⭐⭐☆
- old dresser or shelves (Delta Children, Whitmor alternatives)
- small jars, coffee cans, label maker or permanent marker
- Tools: drill (for securing), basic hardware
Resources & inspiration: check practical guides for decluttering and budget ideas at GarageMadeSimple, RebootMyGarage, and HomeAsWeMakeIt. Explore extra ideas at garage storage hacks, creative garage storage ideas, overhead garage storage ideas, Ikea garage storage hacks, and heavy-duty garage storage.
Pro tip: schedule a 15-minute weekly reset to keep systems working. Save for weekend projects! 📌 Pin for later!