
Show index Hide index
- Quick Answer: Best Directional Signs Halloween Custom Messages — Top Picks & Fast Verdict
- Deep Dive: Why Each Directional Sign Option Wins for Custom Halloween Messages
- Why premium wooden kits outperform generic arrows
- Why weatherproof bundles beat cheap foam outdoors
- When budget picks make perfect sense
- Spec-by-spec breakdown and use cases
- Buying Considerations for Custom HauntDirections and SpookySigns
- DIY Craft Plans: Create Your Own GhoulGuide, TrickTrack Signs and BooBoards
- Materials and supply list with time and cost estimates
- Creative Custom Messages & Placement: WitchWay Signs, PhantomPosts, and FrightfulPaths That Actually Work


Quick Answer: Best Directional Signs Halloween Custom Messages — Top Picks & Fast Verdict
Opening: For anyone planning Halloween walkways or haunted-yard routes, the fastest way to set mood and flow is with Directional Signs Halloween Custom Messages. These signs guide guests, create atmosphere, and become photo-ready props in minutes. 🎃
The best Directional Signs Halloween Custom Messages are: SpookySigns Premium Wood Kit, TrickTrack Signs Weatherproof Bundle, and BooBoards Budget Arrow Set. These three cover pro-level detail, all-weather durability, and wallet-friendly quick setups respectively.
Why these solve the specific problem: The top pick balances paint-ready wood, pre-drilled mounting, and editable message stencils for truly custom messages. The runner-up focuses on longevity for outdoor displays across wet October nights. The budget pick gives instant directional impact for porch or indoor routes without heavy tools.
Quick Answer (compact): For most yard decorators, SpookySigns Premium Wood Kit is the top recommendation — expect crisp edges, six arrows, and downloadable stencil templates for under $45. The runner-up, TrickTrack Signs Weatherproof Bundle, often lands around $70 and includes sealant and stakes for ground mounting. The budget pick, BooBoards Budget Arrow Set, typically costs under $20 and works best for short-term displays or indoor Haunted Hallways. 🔧🕯️
Top recommendation: SpookySigns Premium Wood Kit — approx. $40–$55 depending on seller and custom options.
Runner-up: TrickTrack Signs Weatherproof Bundle — approx. $60–$80.
Budget pick: BooBoards Budget Arrow Set — approx. $12–$25.
Each pick lists one key spec: SpookySigns offers pre-cut pine with stencil templates; TrickTrack uses weatherproof polymer and steel stakes; BooBoards is foam-core arrow signs ready for paint and quick assembly. Pin for later! 📌 Save for reference when planning routes or themed photo spots.
To read Sally Nightmare Before Christmas: Costume and Makeup Guide
Practical scenario: if the yard receives >100 trick-or-treaters per hour, choose TrickTrack for durability; if the display needs to be photographed for social shares and mood, choose SpookySigns for crisp typography and paint finish; if the goal is a last-minute indoor maze, grab BooBoards and a black Sharpie. 🎭
Useful resources for templates and inspiration include project guides like the one at Michaels’ Halloween Directional Sign and community tutorials such as Rambling Introvert’s DIY Direction Sign. For image assets and free vectors to customize messages, Freepik provides ready-to-edit options at Freepik Halloween Directional Sign. These links help translate quick picks into finished yard statements.
Key insight: choose the sign type by placement (ground, stake, wall) and expected exposure to weather — the rest is creative messaging and lighting. 🎃
Latest Spooky Halloween Projection Videos
Discover amazing Halloween projection ideas for your spooky windows!


Keep scrolling for something spooky...

Create Your Own Halloween Projection Magic!
Transform your windows into spooky Halloween displays with professional projection equipment. Perfect for creating the same eerie atmosphere as our kawaii monster videos!
🎭 Affiliate link - Support our spooky content creation!
To read Adhesive Rhinestones Halloween Decorative Applications
Deep Dive: Why Each Directional Sign Option Wins for Custom Halloween Messages
Overview: This section dissects the strengths and trade-offs of premium, weatherproof, and budget directional sign choices for Halloween routes and photo-worthy installations. The focus remains on message clarity, installation, and thematic coherence for HauntDirections and SpookySigns. 🧭
Why premium wooden kits outperform generic arrows
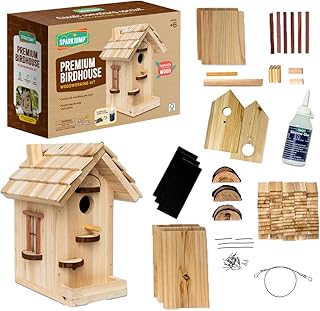
Premium wooden kits win when the goal is long-term reusability and crisp typefaces for custom messages like WitchWay Signs and GhoulGuide. Quality pine or cedar boards absorb paint well and accept engraved lettering, giving a professional finish that photographs cleanly under string lights. These kits usually include pre-cut arrows, pre-drilled holes for fast assembly, and downloadable stencils for phrases like “Beware: FrightfulPaths” or “This Way to the Cauldron.” The trade-off is time: these signs need sanding, two coats of primer, and weather sealing — plan 2–3 hours per sign for a tidy finish.
Why weatherproof bundles beat cheap foam outdoors
Weatherproof bundles like TrickTrack Signs are designed for October rain, wind, and ground moisture. They use polymer boards or sealed wood with marine-grade screws and ground stakes. This quality is crucial when signs guide guests along longer, lit pathways or when installed near wet landscape elements like hay bales or decorative ponds. Expect to pay more, but the benefit is signs that survive a full season and can be stored and re-used. Limitations include less artisanal texture than wood; some decorators solve that by adding thin wood overlays for a rustic look.
When budget picks make perfect sense
Budget arrow sets, labeled here as BooBoards, are foam-core or corrugated plastic arrows that excel for fast setups, indoor haunted halls, and photo booth backdrops. They arrive lightweight and require minimal tools — a craft knife and hot glue are often enough. Their downside is fragility; they can warp in damp conditions and tend to look cheaper at close range. For block parties or short-term displays, they are unbeatable for cost and speed.
Spec-by-spec breakdown and use cases
Specifications to compare include material, finish, mounting method, and message customization. For premium wooden options expect pine/cedar, two coats primer, weather sealer, and mounting hardware included. For weatherproof bundles, look for polymer substrates and galvanized stakes. For budget arrows, expect corrugated plastic or foam with printed decals. Typical price ranges in 2025: premium $35–$80; weatherproof $50–$100; budget $8–$30. Prime or fast shipping options exist on many marketplace sellers, but local craft stores like Michaels often have in-person kits — see their project page at Michaels.
Real scenarios: If the yard layout is narrow with >8ft guest traffic, choose a low-profile arrow mounted at 2–3 feet high to avoid trip hazards and allow stroller passage. For a front-yard haunted trail that loops around landscape features, select TrickTrack with steel stakes anchored into turf. If the goal is an Instagram-ready doorstep scene, choose SpookySigns and pair with seasonal props from curated shops or printable graphics from Pinterest direction sign ideas.
To read Nightmare Before Christmas Party Planning Guide
For downloadable templates and quick inspiration, check themed marketplaces: Fantastical Workshop custom signs and customizable options on Etsy customizable directional signs. These sources speed up production when messages must match a party theme or neighborhood-wide event.
Deep-dive insight: match material to duration and weather; match finish to photography needs; match mounting to guest flow. 🔦
Buying Considerations for Custom HauntDirections and SpookySigns
What to check before buying: material type, mounting hardware, customization options, and whether the seller includes printable stencils or file downloads for transfer. Inspect whether signs are pre-drilled and if stakes are long enough for the yard’s soil depth; for paved driveways, verify that wall-mount brackets or weighted bases are available. These checks prevent awkward mid-installation trips to the hardware store. ⚠️
Common mistakes to avoid include choosing signs solely on aesthetics without checking vertical clearance for headlights and overhanging branches, underestimating wind exposure for lightweight signs, and omitting weather sealant on painted wood. A typical avoidable failure is mounting foam arrows on an exposed fence; in gusts they tear at the screws. Another common error is creating tiny text messages on arrows — text should be legible from 10–20 feet for trick-or-treaters moving at walking pace.
Compatibility issues: confirm that replacement stakes fit your sign holes and that printed vinyl decals fit the sign dimensions. If a designer sign uses a proprietary mounting bracket, research whether standard U-bolts or zip ties can adapt it in a pinch. Also check regional HOA rules if signs face the street — custom messages may need to respect local display codes.
Installation requirements: for ground stakes, plan to hammer at a slight forward angle for wind resistance; for wall mounts, use toggle anchors for theater-style displays on siding. If setting signs on hay bales or pumpkins, secure with heavy-gauge wire or screw them into a small wooden post for stability. Lighting is critical: LED stake lights or solar-powered path lights illuminate messages without overheating paint.
For themed accessory pairings, source yard props like artificial pumpkins, cemetery gates, and scarecrows to anchor messages visually. Suggested vendor resources include Halloween yard decorations, cemetery gates, Halloween scarecrows, and decorative gourds.
To read Fake Diamonds Halloween Table Decorations
Cost breakdown tip: budget $8–$20 per budget arrow, $30–$60 per premium arrow (assembled), and $50–$100+ for weatherproof multi-arrow sets. Factor in paints ($5–$15), primers ($8–$20), sealants ($10–$20), and lighting ($10–$40). Buying paintable kits from craft stores often includes coupons — check Michaels’ project resources at Michaels.
Buying insight: invest in one durable, reusable directional sign for anchor points and supplement with budget arrows for seasonal flair. 🛒
DIY Craft Plans: Create Your Own GhoulGuide, TrickTrack Signs and BooBoards
Craft overview: Building custom message directional signs combines woodworking basics with graphic stenciling and staging knowledge. The workflow begins with selecting the arrow shape, transferring the message, painting, sealing, and mounting. Typical tools include a jigsaw for custom cuts, orbital sander, paintbrushes, a staple gun for vinyl accents, and stakes or posts for mounting. For time planning, allow 45–60 minutes per simple sign and 2–3 hours for multi-layered, weatherproof finishes. ✂️
Materials and supply list with time and cost estimates
Start with 1×6 pine boards for a sturdy feel, cut to 24–30 inches for arrows; foam-core or corrugated plastic works for fast jobs. Paints: exterior acrylic or latex with UV protection. Primer and polyurethane sealer are essential for wooden signs left outside. Add LED rope lights or solar puck lights to backlight messages. Typical costs: wood $5–$10 per board, paint $6–$15 per can, sealant $10–$20, stakes $3–$10 each. Total for a set of four premium arrows: approx. $50–$90.
Step sequence: 1) Trace arrow template on board and cut. 2) Sand edges and drill mounting holes. 3) Prime with outdoor primer, let dry. 4) Paint background coat and stencil message with contrasting paint. 5) Seal with two coats exterior polyurethane. 6) Mount on stakes or brackets and anchor into the ground or bale.
Anecdote for illustration: a neighborhood craft designer set up a two-way route using a central post with three rotating arrows labeled WitchWay Signs, PhantomPosts, and MonsterMessage Boards. The post used a lazy-spindle mechanism allowing decorators to flip messages mid-evening for a surprise effect. That cost $15 extra for the spindle but created interactive delight for repeat visitors.
Stencil tips: vinyl cutter files from Etsy or downloadable vectors from Freepik speed up layout and yield crisp letters — ideal for TrickTrack professional photos. For a hand-painted rustic look, use foam letter stamps and distress the edges with fine sandpaper after sealing. For a luminous night effect, incorporate glow-in-the-dark paint on borders or arrow tips and attach low-wattage LED strips behind the sign face.
To read Fake Glass Shards Halloween Safe Props
Installation examples: On grass, anchor stakes 12–18 inches deep and pack soil around them. On pavement, use weighted bases filled with sand and attach sign posts with carriage bolts. If mounting to fencing or walls, use brackets and ensure the sign surface sits at 42–48 inches for optimal sightlines. Consider pairing signs with small props available from specialty pages like mini wheelbarrows or plant pot covers to anchor messages visually.
DIY insight: the biggest returns come from an intentional mix of one durable anchor sign and multiple playful, low-cost supplements that can be swapped annually. 🛠️
Creative Custom Messages & Placement: WitchWay Signs, PhantomPosts, and FrightfulPaths That Actually Work
Creative messaging strategy: Custom messages turn arrows into narrative beats. Short, punchy phrases read fastest: “WitchWay”, “GhoulGuide”, “TrickTrack”, “BooBoards”, “CreepyCustoms”, and “FrightfulPaths” — all make memorable photo captions and map guests through an experience. Use contrast: pair a spooky command like “Enter at Your Own Risk” with whimsical directions such as “Candy This Way” to balance fear and fun. 📷
Placement guidance: position anchor signs at decision points — driveway split, yard gate, or sidewalk turn. Place smaller arrows at 10–15 foot intervals along paths; ensure each arrow is visible from the previous one to reduce confusion. For driveways, mount signs at 3–4 feet high to remain visible from a low car window. For trick-or-treat routes, set signs at child eye level (about 3 feet) to maximize readability.
Lighting matters: backlit signs create silhouette effects; string lights outline arrow shapes; solar stake lights highlight ground-level arrows. For galleries or photo zones, mount a single ornate sign on a post with surrounding props like pumpkins, themed baskets, and hay bales from suppliers such as hay bales and themed Halloween baskets. Add fog machines sparingly to avoid visibility loss along narrow paths.
Messaging examples to copy: “This Way to the Cauldron — 10 ft” (adds a playful distance), “Beware: Zombies Ahead — Turn Back!” (uses humor), “PhantomPosts: Photo Ops” (labels a selfie stop). For family-friendly neighborhoods, lean toward playful lines; for haunted attractions, use ominous commands and intermittent thematic props like cemetery gates and scarecrows to enforce the atmosphere. For design inspiration, browse curated boards at Pinterest directional sign ideas.
Supplier match-ups: hand-painted bespoke signs from Fantastical Workshop are ideal for branded events or small haunted houses; Etsy sellers offer affordable customizable options at Etsy custom directional sign Halloween. For last-minute printable graphics that pair with signs, check the free graphics repository on Freepik and adapt sizes to your sign faces.
Safety and neighborly considerations: avoid messages that might spook very young children excessively, and ensure signs do not block sidewalks or create tripping hazards. Coordinate timing and placement with neighbors if running a multi-house trail to maintain flow and avoid congestion. For community events, mark emergency exits clearly and use reflective tape on signs near roads for driver visibility.
Creative insight: combine one striking anchor sign with rotating small arrows carrying witty micro-messages to keep guests engaged and create multiple Instagram moments. Save the best line for the photo zone. ✨
Related shopping and inspiration: find complementary items like artificial pumpkins and themed kitchen textiles at artificial Halloween pumpkins, Halloween aprons, and kitchen towels for party prep, or pick up scare props at scary Halloween gnomes.
Final actionable tip: plan placement 45–60 days ahead for neighborhood events and order custom pieces early to allow for personalization and shipping. Save this guide and return to the craft and placement sections when laying out your route. 🎃