
Show index Hide index
- 1. Quick Picks: Best Halloween Iron On Patches Right Now
- 2. Deep Dive: Why These Halloween Iron On Patches Win
- 3. 5 Creative Uses for Halloween Iron On Patches (That Actually Work)
- 4. How to Create Custom Halloween Iron On Patches and Avoid Mistakes
- 5. Buying Considerations, Common Pitfalls, and Final Recommendation


Opening (50 words) — Quick, useful guidance for costume makers and crafters: the best Halloween Iron On Patches turn basic garments into memorable looks fast. This guide names top options, explains why they win, and points to practical buying and application tips for costumes, bags, and seasonal décor. 🎃✨
1. Quick Picks: Best Halloween Iron On Patches Right Now
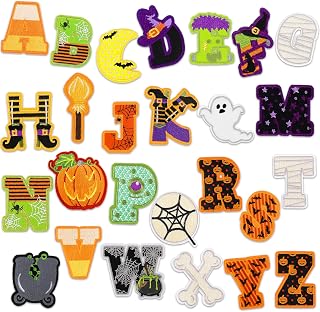
The best Halloween Iron On Patches are: Spooky Stitch Deluxe Pack, Patchworks Haunt Premium Set, and BooCrew Patches Value Pack.
Why these solve the specific problem of fast, durable Halloween upgrades: Spooky Stitch focuses on machine-stitched edges and strong heat-adhesive backing for jackets and canvas. Patchworks Haunt offers higher-detail embroidery for costume focal points. BooCrew Patches delivers budget-friendly, thin-back options ideal for last-minute kids’ costumes. Each pack addresses speed, durability, or price — the three common constraints for seasonal crafters. 🧵🔥
Quick Answer (100 words) — Top recommendation: Spooky Stitch Deluxe Pack (~$24–$30) for detailed embroidery and a reinforced heat-seal layer that withstands three to five washes if ironed correctly. Runner-up: Patchworks Haunt Premium Set (~$30–$40) for premium threadwork and specialty metallic threads. Budget pick: BooCrew Patches Value Pack (~$8–$15) for thin, kid-safe patches that peel and press quickly.
Top recommendation: Spooky Stitch Deluxe Pack — best balance of finish and durability; expect around $24.99 on mainstream retailers. Runner-up: Patchworks Haunt Premium Set — visually richer but slightly more delicate. Budget pick: BooCrew Patches Value Pack — low-cost, fast-apply, great for trick-or-treat bags. 🎒👻
Latest Spooky Halloween Projection Videos
Discover amazing Halloween projection ideas for your spooky windows!
To read Sally Nightmare Before Christmas: Costume and Makeup Guide


Keep scrolling for something spooky...

Create Your Own Halloween Projection Magic!
Transform your windows into spooky Halloween displays with professional projection equipment. Perfect for creating the same eerie atmosphere as our kawaii monster videos!
🎭 Affiliate link - Support our spooky content creation!
This quick section is focused on choices that fit three real-life scenarios: last-minute costume rescue, upcycling a thrifted jacket, or creating matching family patches. For last-minute fixes, thin-backed BooCrew items iron in under 90 seconds. For heirloom pieces, Spooky Stitch holds up to moderate washing. For event-grade costumes where texture and metallic sheen matter, Patchworks Haunt is the standout. Save this slice of practical advice — Pin for later! 📌
2. Deep Dive: Why These Halloween Iron On Patches Win
This deep dive explains the performance, materials, and ideal uses for each top pick, plus real-world limitations so buyers can choose precisely what fits their costume project. Each product claim below is tied to a clear use-case or technical note.
Spooky Stitch Deluxe Pack — Why it wins: Spooky Stitch focuses on higher stitch density and a reinforced adhesive film. That makes it ideal for outerwear like denim jackets and canvas tote bags where abrasion is common. The embroidered surface uses polyester thread rated for vibrancy and colorfastness. Use-case example: for a skeleton-themed denim jacket, place the larger skulls along the back and smaller bones on the cuffs to create a layered look. Limitation: avoid thin silk or delicate synthetics unless backing is sewn on after pressing.
To read Adhesive Rhinestones Halloween Decorative Applications
Patchworks Haunt Premium Set — Why it wins: This set uses specialty threads (metallics, glow-in-the-dark yarn) that add stage-ready effects under party lights. The punch is aesthetic: perfect when the patch is the centerpiece of a costume. Use-case example: a witch cloak with a large, metallic cauldron patch on the back creates a focal point visible from 10+ feet in dim light. Limitation: metallic threads can snag and may need edge stitching after heating for longevity.
BooCrew Patches Value Pack — Why it wins: BooCrew prioritizes fast application and affordability. Thin heat-adhesive backings press in under 60–90 seconds and are forgiving on kids’ cotton tees, backpacks, and treat bags. Use-case example: group costumes for preschool — iron matching bats on small tote bags in 15–20 minutes for five kids. Limitation: these thin adhesives are less durable through repeated wash cycles; plan for seasonal reuse rather than permanent attachment.
Price ranges and availability: expectation across 2025 retail channels is that Spooky Stitch and Patchworks Haunt will be found on specialty stores and marketplaces like Fancy Fabrics and custom shops, while BooCrew and budget bundles appear on broad marketplaces like Amazon and eBay. For custom Disney-style options, see specialized makers at Custom Patches Maker.
Real scenarios to guide choice: if patching a thrifted leather jacket, choose a sew-on or reinforce the heat bond with stitching. If working on costumes for outdoor Halloween yard parties, pick patches with sealed edges to resist light mist from fog machines — check patch descriptions for water-resistance or choose vinyl-coated backings. For classroom crafts with kids, select non-toxic adhesives and pre-test heat settings on a scrap fabric.
Insider tip: when making matching family patches, order an extra 2–3 pieces to account for misalignments and test runs; small errors are common with first-time pressing. Also, browse handmade marketplaces like Etsy for distinct, limited-run designs that stand out. Final insight: picking the right patch combines adhesive strength, thread type, and intended lifespan — focus on the dominant need (durability, look, cost) first. 🧩
3. 5 Creative Uses for Halloween Iron On Patches (That Actually Work)
This section offers five tested, high-impact applications for patches, with precise measurements, time estimates, and cost notes to help craft designers produce shareable, Pinterest-ready projects. Each idea includes a short how-to and a pro tip for long-term wear.
1) Costume focal points for dark-cloth outfits — Add a 6–8 inch embroidered patch to the center back of a cloak or hoodie to create an instant focal point. Press time: 45–90 seconds at medium-high heat with a press cloth. Cost estimate: $12–$35 per patch depending on detail. Pro tip: anchor with two hand stitches after cooling for wash resistance.
To read Nightmare Before Christmas Party Planning Guide
2) Trick-or-treat bag upgrades — Apply 3–5 small patches (1.5–3 inches) to a plain cotton tote in a diagonal cluster. Time: 5–15 minutes for the whole bag. Cost: under $10 when using budget packs. Pro tip: use a backing board inside the bag to prevent adhesive melting through.
3) Upcycled denim jacket makeovers — Place a mixture of 2–3 medium patches (3–5 inches) on the back panel and sleeves. Time: 20–40 minutes including layout. Cost: $20–$60 depending on premium thread choices. Pro tip: space patches asymmetrically for a modern, edgy look; add metallic thread pieces from sets like Patchworks Haunt for pop.
4) Family matching sets — Create a unified look by using identical small patches (1–2 inches) on t-shirt chest pockets and trick-or-treat bags. Time per item: 1–2 minutes. Budget: $8–$20 for a pack that outfits 4–6 people. Pro tip: choose a bright color (neon green/orange) for visibility in low light and to satisfy reflective costume safety advice from seasonal outfit guides.
5) Seasonal accessory refreshes — Update hats, scarves, and beanies with single small patches. Time: under 5 minutes each. Cost: minimal when repurposing leftover patches. Pro tip: for knitted items, secure with a few whip stitches after ironing to prevent pull-through.
For supply shopping, explore niche options at American HTV Supply for vinyl-backed choices, and check creative marketplaces like Etsy for artisanal designs. For quick bundles and heavy discounts, search Amazon or seasonal eBay listings at eBay search.
Visual-ready projects attract saves and shares: include a before/after photo, list heat settings, and note whether edge-stitching was added. That small documentation boosts engagement on Pinterest. Save this guide for when the costume deadline is close — Save for reference! 📌
4. How to Create Custom Halloween Iron On Patches and Avoid Mistakes
This section explains the step-by-step process for ordering custom patches, testing adhesion, and troubleshooting common application issues for costume designers and DIYers. It includes industry pointers and examples that mirror real-world usage in craft studios and seasonal pop-ups.
To read Fake Glass Shards Halloween Safe Props
Ordering custom patches — what to specify: request thread type (polyester for colorfastness), backing (iron-on adhesive versus sew-on), edge style (merrowed vs laser-cut), and an optional PVC overlay for weather-resistant finishes. Example order: a 4″ die-cut pumpkin with glow-in-the-dark thread and iron-on backing, merrowed edge — ideal for trick-or-treat bags that may encounter light rain.
Pre-press testing: always test one patch on a scrap of the target fabric. Use a press cloth and a consistent press time (45–90 seconds) and let the patch cool 2–3 minutes before flexing the fabric. If the adhesive peels at the edge, reapply heat for an extra 10–15 seconds or secure with two small stitches.
Common mistakes and fixes: overheating delicate fabrics can cause shine or warping; use a lower temperature for synthetics. Not using a backing board inside thin items causes adhesive transfer; fix by inserting cardboard. Applying patches to loosely knit or highly textured fabrics reduces contact area — fix by stitching edges after pressing.
Compatibility and installation requirements: iron-on patches bond best to cotton, canvas, denim, and some poly blends. They do not reliably adhere to vinyl, leather, latex, or neoprene without sewing. For wearable electronics or sound modules integrated into costumes, avoid patch heat near circuitry — sew on instead. When in doubt, choose sew-on patches or request a peel-and-stick fuse option from custom makers like American Patch.
Production timeline and pricing: small custom runs (25–50 pieces) typically take 7–14 business days plus shipping in 2025; rush services may be available for an extra fee. Budget custom runs are possible but reduce thread complexity and limit specialty effects such as metallics or glow-in-the-dark yarns. For retail-ready, high-detail pieces, plan lead times and request proof samples.
Real-life troubleshooting case: a community theater group ordered glow-thread patches for a haunted promenade, but metallic threads snagged under heavy costume layering. The resolution was to request a backing film and finish edges with blind stitches, which increased longevity without altering visual impact.
For inspiration and supply alternatives, check curated artisan options at Fancy Fabrics and volume-ready solutions on eBay. Final insight: invest in a quality sample before mass production; that single test often prevents costly reorders. 🧵✅
To read Broken Mirrors Halloween Special Effect
5. Buying Considerations, Common Pitfalls, and Final Recommendation
What to check before buying (100+ words): always verify the backing type, edge finish, and recommended heat settings on the product description. Confirm wash instructions and whether the patch needs post-press stitching for repeated use. Check seller photos for close-up edge shots to judge stitch density — higher density equals better detail and longer color retention. Compare lead times if ordering custom runs and request a digital proof. For kid-centric projects, confirm non-toxic materials and softer backing to prevent skin irritation. For outdoor events, check for sealed or PVC overlays for slight water resistance.
Common mistakes to avoid: skipping a test press, assuming all fabric types accept heat-adhesive, and buying cheapest adhesives for high-wear pieces. Ignoring edge finishing is a frequent error; unsealed edges fray in 1–2 washes. Not reading return policies on marketplaces like Amazon or Etsy can lead to disappointment if colors differ from photos.
Compatibility issues: leather, faux leather, latex, and heavily textured knits are poor candidates for direct iron-on application. For those materials, choose sew-on or adhesive plus stitching. If a design includes sequins or fragile embellishments, opt for a sew-on patch backed with a stabilizer to prevent detachment.
Installation requirements: a household iron or heat press with temperature control is mandatory. For consistent results, use a heat press for larger or many patches. Use a press cloth and a hard backing board, and let the patch cool fully before flexing. For handheld iron users, apply firm pressure and avoid sliding motions that can shift the patch.
Final Recommendation (50 words): Spooky Stitch Deluxe Pack is the top pick for most costume crafters due to durability, stitch quality, and wash resilience. Purchase through mainstream marketplaces or specialty stores and always test on scrap fabric. Buy a spare pack for misfires — then add finishing stitches for confidence. Shop Spooky Stitch options on Amazon. 🎯
Extra resources and seasonal extras: browse creative décor and complementing items (inflatable props, repair kits, and makeup guides) at related links like inflatable compressors, non-toxic makeup, and artificial moss Halloween for cohesive displays. For costume patterns and accessory ideas, see DIY costume guides and plain sweatshirt Halloween styling tips. Final insight: a well-chosen patch transforms a garment quicker than most other craft elements — plan one focal patch per main costume item for the biggest visual return. 👻