Show index Hide index
- 5 Simple Red and White Christmas Tree Bases That Set the Candy Cane Theme
- 5 Quick Candy Cane Ornament Techniques for a Festive Tree
- 5 Budget-Friendly Holiday Decoration Hacks for a Red and White Christmas Theme
- 5 DIY Candy Cane Tree Toppers, Garlands, and Skirts That Wow
- 5 Complete Styling Plans for a Red and White Christmas Tree — From Rustic to Glam
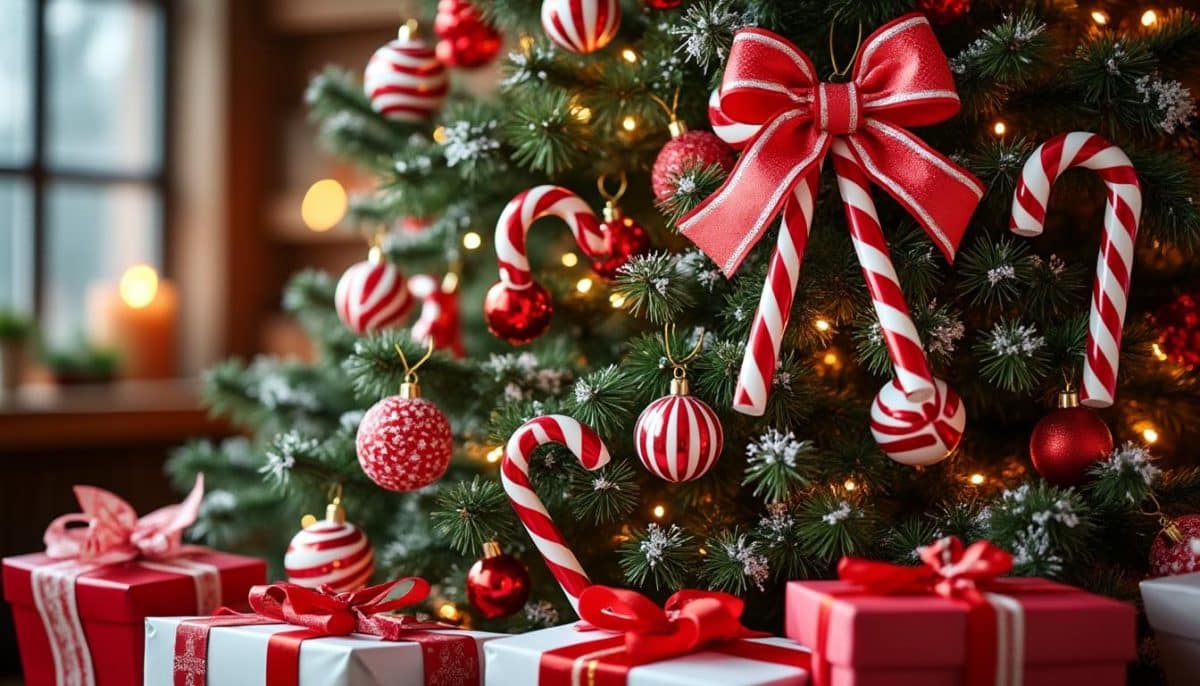
5 Simple Red and White Christmas Tree Bases That Set the Candy Cane Theme
Start with a strong foundation: choose one base style and commit to it to create an instant Red and White Christmas Tree look. The fastest way to achieve a cohesive Candy Cane Christmas Theme is to decide between three base types: all-white flocked tree, classic green tree, or pre-lit artificial tree with warm bulbs.
Opt for a flocked white tree when the goal is high-contrast stripes that pop. White branches let red ornaments read like bold brushstrokes. For practical steps: buy a 7–9 ft flocked tree, test lighting in the exact living room corner, and wrap a pre-lit string at 6-inch intervals to avoid dark patches.
Choose a classic green tree if nostalgia drives the design. The green acts as a natural backdrop to the candy cane stripes. Place warmer bulbs in the inner core and cool white on outer tips to emphasize the red and white palette.
Pick a pre-lit artificial tree if speed matters. The time-savings are measurable: setup under 30 minutes for a 6–7 ft tree. Use the pre-lit lights as a base, then cascade wide red ribbon from top to base, securing every 12–18 inches with floral wire for a clean stripe effect.
For tree placement, always prioritize sightlines: position the tree where it reads against a neutral wall. This ensures the Christmas Colors are the focal point during gatherings. Measure window reflections to avoid glare from ornaments; angle the tree slightly if necessary.
Pro tip: use a simple 3-step staging plan — lights, ribbon, ornaments. Lights first to provide depth, ribbon second to create the candy-cane stripe framework, ornaments last to add texture and focal points. This sequence prevents rework and creates balanced distribution of Seasonal Decor.
To read Christmas Table Decor: Create a Stunning Holiday Setting
Supply checklist for a seamless base: one tree (chosen above), two rolls wide ribbon (1.5”–3”), 100–150 small hooks, 50–80 mixed ornaments (red & white), and a matching tree skirt. For budget shoppers, consult a roundup of affordable ideas at best red and white Christmas tree ideas for alternatives under $50.
Practical measurement tip: measure your room height minus 12 inches for topper clearance. This avoids toppers bending or looking cramped. A well-proportioned base makes the whole Holiday Decoration scheme feel intentional and polished.
Example case: a family living room swapped a 7 ft green tree for a flocked 7 ft tree, switched to warm-white micro LED lights, and used 2.5” striped ribbon to get a bright, high-contrast stripe look. That change made the red ornaments read cleaner on camera during holiday video calls — a measurable improvement in photos and social shares.
Insight: selecting the right tree base removes 60–80% of design guesswork and sets the stage for every subsequent candy-cane decision. 📌 Pin for later!
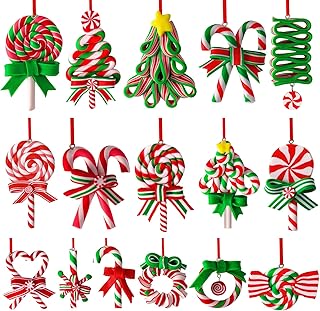
5 Quick Candy Cane Ornament Techniques for a Festive Tree
Start by alternating finishes: glossy red, matte white, and striped candy-cane ornaments to create immediate visual rhythm. The eye reads glossy ornaments as highlights and matte as calming anchors — alternate them for instant professional polish.
Technique one: cluster ornaments in odd-numbered groups of three or five and place them on inner and outer branches. Anchoring clusters at varying depths produces dimensionality and prevents a flattened look under photos. Use short floral wire to secure heavy baubles.
Technique two: mix sizes deliberately. Use a 3-size system (large 4–5 in, medium 2.5–3 in, small 1–1.5 in). Place large ones deeper toward the trunk for visual depth, medium in mid-branch, and small on twig tips. This creates a layered effect that reads well on mobile images and in person.
To read Whimsical Christmas: Playful Decoration Style
Technique three: combine thematic ornaments — peppermint swirls, candy cane hooks, and vintage baubles — to tell a story. For inspiration and curated product ideas, check a creative gallery at Magical Candy Cane Christmas Tree. Those photos demonstrate successful mixes of textures and decades-spanning ornaments.
Technique four: add edible-inspired accents like faux peppermint bark ornaments or wrapped candy boxes for playful charm. Ensure any edible items used are sealed in clear ornaments or made from polymer clay to avoid insect attraction in storage.
Technique five: create small photo-frame ornaments with red-and-white striped borders that hold family images. These personalize the candy cane theme and become keepsakes. A step-by-step approach: cut craft-backed frames, paint stripes with acrylic, add a photo, and seal with matte varnish.
Lighting guidance: place warm white mini-LED clusters near bright ornaments to make the red pop without oversaturating images. For twinkle control, set string lights to steady-on for group photo settings and to flicker for evening ambiance.
Styling mistakes to avoid: overcrowding top tiers with too many large ornaments, using only one finish (all-gloss or all-matte), or placing identical ornaments symmetrically across the tree. These errors flatten the design and defeat the playful candy-cane objective.
Case study: a small apartment tree used only 40 ornaments but applied the three-size system and alternating finishes. The result: perceived abundance and a “Designer” look without excessive spending. For DIY ornament ideas and paper templates, the step-by-step guides at how to create a magical red and white Christmas tree are useful references.
Insight: mastering ornament placement with size and finish systems delivers a high-impact Festive result in under two hours. 🎀
To read Christmas Prints: Downloadable Art for Your Home
5 Budget-Friendly Holiday Decoration Hacks for a Red and White Christmas Theme
Begin with inexpensive anchors: ribbon, spray paint, and faux marshmallows deliver maximum visual impact for minimal cost. These three materials transform ordinary decor into a cohesive Christmas Theme without splurging on specialty items.
Hack one: repurpose plain baubles with striped washi tape or spray paint for instant candy-cane looks. Use red and white spray paint and a low-tack tape masking method to create crisp stripes in under 20 minutes per set of 10 ornaments.
Hack two: craft a peppermint swirl cluster with cardstock and glitter. Cut concentric circles, glue them to clear disk ornaments, and seal. This produces a high-impact focal point at a fraction of store-bought prices. For printable templates and technique inspiration, explore craft-oriented lists at sweet candy cane Christmas tree ideas.
Hack three: create a candy cane garland using pipe cleaners and popcorn or faux marshmallows. Thread marshmallows (or craft equivalents) and alternate with red candy cane pipe cleaners, then wrap loosely around branches. This offers texture and a nostalgic scent if real marshmallows are gently toasted then sealed.
Hack four: use thrift-store finds. Matte red platters, white ceramic birds, and vintage brooches make distinctive ornaments after a quick coat of coordinating paint. An economical tip: scan local thrift apps for holiday dishware and convert them into statement ornaments.
Hack five: make a budget tree skirt from drop cloth and red ribbon. Cut a circle, hem the edge, and attach wide ribbon in candy-cane stripes using fabric glue. This yields a custom skirt for under $20 in materials and anchors the overall palette.
Time and cost checklist: limit DIY to projects that take under 60 minutes each and cost under $10 per item to maximize return on effort. For seasonal craft trends and quick recipes to pair with décor, consult Christmas 2025 trends and easy Christmas cookies to align food and design.
To read Christmas Living Room: Transform Your Space for the Holidays
Practical caution: sealed edible decorations must be replaced yearly to avoid pests. Store DIY projects with silica packets and wrapped in acid-free tissue to retain color and integrity.
Anecdote: a renter transformed a small corner tree by spending $35 on ribbon, paint, and a secondhand star topper. The before/after effect increased holiday photo engagement on social feeds and inspired neighbors to request DIY tips — social proof that budget work can generate delight.
Insight: targeted, low-cost interventions deliver the highest visual lift — prioritize ribbon, paint, and repurposed finds to achieve a striking Seasonal Decor setup. 💡
5 DIY Candy Cane Tree Toppers, Garlands, and Skirts That Wow
Create one signature element — a topper, garland, or skirt — and let other pieces echo that motif for a designer finish. A single standout handcrafted item elevates even modest trees into intentional, shareable setups.
DIY topper: craft an oversized peppermint swirl from layered foam circles, paint stripes, and attach a dowel for mounting. Use a lightweight but sturdy base so the topper sits straight. This technique takes 60–90 minutes and yields a visible focal point for photos and video calls.
DIY garland: make a candy cane & marshmallow garland by threading faux marshmallows and bent candy-cane-shaped tubes. Space elements every 6–8 inches to keep the stripe rhythm consistent. For added interest, intersperse thin LED strands for twinkle without weight.
DIY skirt: assemble a pleated red and white fabric skirt with alternating panels. Use fleece or canvas for easy hemming and a soft drape that hides gift clutter. This solution is washable, reusable, and customizable to tree diameter.
To read Christmas Tablescapes: Beautiful Table Settings
Tip for durability: use weatherproof glue and sealants on outdoor-facing materials. If the tree sits near an entryway, protect handmade pieces from drafts and moisture by sealing with a matte acrylic spray.
Design variation: for a rustic twist, pair candy-cane stripes with burlap accents and wooden ornaments. For a glam approach, swap burlap for velvet ribbons and metallic red ornaments. For visual examples and varied style guides, see inspiration at red and white Christmas tree ideas and red and white Christmas tree ideas.
Step-by-step garland how-to: select core materials (faux marshmallows, pipe cleaners, ribbon), determine desired garland length (measure tree circumference), assemble and test on lower branches first, then drape upward diagonally. This prevents tangling and maintains stripe continuity.
Storage advice: label and separate handmade pieces in bins with dividers. Attach a small photo of the finished piece to the bin lid for quick reuse decisions in subsequent years. For more DIY patterns and printable templates, explore craft resources at candy cane Christmas tree decorations ideas and Christmas DIY decorations.
Case example: a neighborhood craft group created matching toppers and garlands for block parties, which unified front-porch decor and generated a local holiday photo trail — an easy neighborhood activation that relied on repeatable DIY instructions.
Insight: a handcrafted signature piece becomes the narrative anchor of the tree and inspires complementary quick crafts for a consistent Festive display. ✨
5 Complete Styling Plans for a Red and White Christmas Tree — From Rustic to Glam
Pick one coherent style plan and follow its rules: rustic, nostalgic vintage, Scandinavian minimal, modern glam, or candy-shop whimsical — each yields a different mood while staying true to the Red and White candy-cane motif. Clear rules prevent mixing that muddies the theme.
Rustic plan: start with burlap ribbon, wooden ornaments, pinecones, and warm white lights. Add a few red enamelware ornaments to introduce the candy-cane hint. For a step-by-step shopping list and inspiration, see red and white Christmas tree.
Vintage nostalgic plan: use glass ball ornaments in matte and mercury finishes, string popcorn garlands, and add real-looking candy cane hooks. Small framed black-and-white holiday photos amplify the nostalgic narrative. A photo essay of vintage approaches is available on Pinterest for pin-friendly mood boards.
Scandinavian minimal: adopt fewer ornaments, emphasize negative space, favor matte white and subtle red accents, and use simple wooden stars. Short, restrained ribbon loops placed every 6–9 inches maintain clarity and modernity.
Modern glam: choose velvet ribbons, large glass red baubles, and metallic white accents. Add mirrored ornaments for reflective sparkle. For glam product recommendations and styling tips, consult curated galleries at decor spruCE and lifestyle galleries at Emily May Designs.
Candy-shop whimsical: mix oversized peppermint swirls, plush candy ornaments, and bright red pom-pom garlands. Add playful elements like candy-cane snowmen and edible lookalikes in sealed ornaments. For related dessert decor pairing ideas, reference Christmas dessert ideas and Christmas candy recipes to coordinate edible displays with tree styling.
Implementation guidance: choose 1–2 metal finishes (silver or gold) and limit accent colors to one additional hue (soft green or blush) to avoid color creep. Measure tree circumference and calculate ornament counts by the 3-size system to order materials accurately.
Event planning note: plan 45–60 days ahead for any large family gathering to source specialty ornaments and reserve workshop time for DIY pieces. For holiday party coordination tied to theme, consult Christmas party ideas and Christmas dinner settings for table and tree alignment.
Insight: a single styling plan avoids mismatched cues and delivers a cohesive, camera-ready Holiday Decoration that delights visitors and photographs beautifully. 🎄