
Show index Hide index
- 1. Quick Picks: Best Pumpkin Carving Kits and Templates for Halloween
- 2. 2. Family & Kids Pumpkin Carving Kits — Safe, Simple, Fun
- 3. 3. Advanced Tools & Pro Techniques — For Serious Pumpkin Sculptors
- 4. 4. Templates, Stencils & Printable Patterns — Endless Ideas and Sources
- 5. 5. Hosting a Carving Party & Pumpkin Care — Setup, Preservation, and Styling


Pumpkin Carving Halloween Best Kits and Templates — a practical guide to pick the right kit, stencil, and tools for every skill level and party scenario. Expect clear recommendations, tested-use scenarios, and reliable links to resources like Pumpkin Pile and Pumpkin Lady. Perfect for planning a Carving Party or upgrading a seasonal decor setup. 🎃✨
1. Quick Picks: Best Pumpkin Carving Kits and Templates for Halloween
Opening (50 words): The best pumpkin carving kits and templates make carving faster, safer, and more creative. For 2025, look for kits that bundle ergonomic tools, press‑on stencils, and templates that scale to different pumpkin sizes. Focus on age-appropriate sets for families, and pro-grade options for ambitious sculptors. 🎃
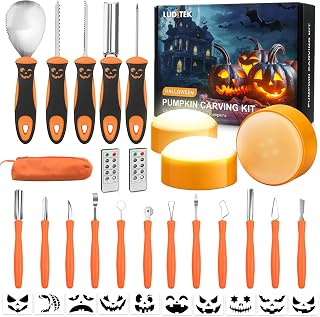
Answer — Pumpkin Carving Halloween Best Kits and Templates: The best Pumpkin Carving kits and templates are: Pumpkin Masters Family Carving Kit, Deluxe Pumpkin Carving Kit, and Pumpkin Master Sensational Shadows. These three cover family-friendly simplicity, versatile tool selection, and spooky silhouette designs that work across skill levels.
The best Pumpkin Carving Halloween Best Kits and Templates are: Pumpkin Masters Family Carving Kit, Deluxe Pumpkin Carving Kit, Sensational Shadows. Each solves a specific problem: the Family Kit simplifies safe carving for kids, the Deluxe Kit includes specialty saws and scrapers for clean edges, and Sensational Shadows focuses on dramatic light-and-shadow effects for window or porch display.
Quick Answer (about 100 words): For an all-round top pick, go with a kit that includes a range of saw sizes, a scraping tool, and at least 8–16 stencils for varied faces and scenes. Top recommendation: Pumpkin Masters Family Carving Kit — typically under $25 and widely available. Runner-up: Deluxe Pumpkin Carving Kit — around $30–$40 with sturdier blades. Budget pick: a 5‑piece kids’ press‑and‑carve stencil pack for under $10. Each option offers clear specs: saw blade length, ergonomic handle, and number of stencils. Pin for later! 🔖
Latest Spooky Halloween Projection Videos
Discover amazing Halloween projection ideas for your spooky windows!
To read Sally Nightmare Before Christmas: Costume and Makeup Guide


Keep scrolling for something spooky...

Create Your Own Halloween Projection Magic!
Transform your windows into spooky Halloween displays with professional projection equipment. Perfect for creating the same eerie atmosphere as our kawaii monster videos!
🎭 Affiliate link - Support our spooky content creation!
Deep Dive (200–400 words): The Pumpkin Masters Family Carving Kit stands out for safety and variety. It usually includes a small serrated saw, medium saw, scoop, and 16 patterns that range from simple smiley faces to themed scenes. The press-and-carve stencils adhere with a temporary glue, reducing slipping on curved surfaces — ideal for children and first-timers. The kit’s tools are lightweight yet durable enough for thin and medium-thickness rinds. A drawback: the thin saws can struggle with very thick pumpkins or detailed negative-space designs.
The Deluxe Pumpkin Carving Kit adds specialty tools such as V-cutters, loop tools for shading effects, and a sturdy scraper for thinning walls. These tools enable advanced techniques like graduated depth carving to create lanterns that glow with layered detail. The trade-off is a steeper learning curve; such kits pair well with practice on small gourds before tackling prize pumpkins. Price ranges commonly sit between $30 and $50, often stocked at retailers listed in reputable roundups like Good Housekeeping and HGTV.
For sculptors leaning into power tools, consider accessories from brands such as Dremel and Seymour Carving Tools. A rotary tool with a straight‑cut bit speeds through thick rinds and offers fine detail but requires steady hands and safety measures. Pair a Dremel with an Orange Wheel sanding attachment for smoothing carved edges. These setups are best for 14″‑plus pumpkins and for carvers comfortable with power tools. Real-world scenario: if carving for a block contest, choose the Deluxe Kit for fine textures, then finish with a Dremel for crisp teeth and eye sockets.
Buying Considerations (100 words): Check blade material and handle ergonomics before purchase. Confirm number and style of stencils — press‑and‑carve sheets are fastest; printable templates offer infinite options from sites like Pumpkin Nook and Artsy Dee. Ensure any power-tool compatibility (voltage, collet size) and look for replacement blades sold separately. Avoid kits that pack only stickers or paint if the goal is real carving. Final note: always pair small‑tooth saws with a stable carving surface and good lighting. 🔦
To read Christmas Templates for DIY Projects and Printables
Final Recommendation (50 words): The top pick for most households is the Pumpkin Masters Family Carving Kit — affordable, safe, and versatile. Buy it for your next Carving Party via Amazon or retailer links above. Ready to carve? Find templates and more at Pumpkin Pile. 🎃
2. 2. Family & Kids Pumpkin Carving Kits — Safe, Simple, Fun
Opening (50 words): Family-first kits prioritize safety, quick wins, and templates that fit small hands. The aim is minimal frustration, memorable photos, and a cupboard of reusable stencils for next year. Focus on glue-on stencils, blunt saws, and alternative activities for toddlers such as painting and stick-on decals. 🎨👻
Family-focused kits like the Pumpkin Masters Family Favorites and Peanuts-themed press-and-carve packs deliver age-appropriate patterns and often include a glue stick for secure stencil placement. Press-and-carve stencils reduce the need for freehand drawing and make alignment simple on round surfaces. For very young participants, kits that combine carving with painting reduce risk while maintaining creativity; guides from resources such as Neuchcup painted pumpkin ideas are great for inspiration. Many family kits come with 8–16 stencils, a scoop, and a small serrated saw with a rounded tip for safer first cuts.
Safety is the defining criterion here. Look for tools with ergonomic handles, short blade exposure, and instructions that encourage two-adult supervision for younger kids. Avoid razor-sharp chef-style knives; instead, opt for kits whose blades are designed to cut fibrous pumpkin flesh with a saw-like motion. For family parties, set up stations: one for scooping seeds (with oven-roasting instructions), one for stencil transfer, and one for carving or painting. Roasting the seeds becomes a reward and helps keep little hands engaged; look for recipes in seasonal collections or on HGTV recipe roundups.
Examples: A neighborhood Carving Party split by age can run efficiently. Station A (ages 3–7): painting and stickers, inspired by mini pumpkin painting ideas. Station B (ages 8–12): press-and-carve stencils and supervised saw use. Station C (teens and adults): advanced shading stencils and loop tools for texture. This segmentation keeps flow smooth and reduces risk of tool misuse.
Template choices for kids should emphasize bold shapes and high contrast. Classic eyes, triangle noses, and large mouths translate well to quick carving and great glowing results. Character packs — Think Peanuts, classic monsters, or friendly animals — hold attention longer than abstract patterns. For printable options, providers like Pumpkin Pile and Real Simple have easy-to-scale patterns suitable for children.
One practical tip: thin the inner wall to 1/2″–3/4″ where the stencil sits to increase light diffusion without compromising structure. Use a spoon-like scraper included in family kits for this. Store leftover stencils in a labeled envelope and plan recipes for seeds — a small time investment yields reuse and easy decor updates across the season.
To read Nightmare Before Christmas Party Planning Guide
Final insight: prioritize ease and safety first, then creativity; a successful family night trades a perfect carving for shared laughter and a shelf of photos. 🎃
3. 3. Advanced Tools & Pro Techniques — For Serious Pumpkin Sculptors
Opening (50 words): Advanced carving requires specialized tools, steady hands, and time. Pro kits mix hand tools with power accessories to execute layered shading, realistic textures, and structural cuts. Seek high-quality blades, loop tools, and optional rotary tools for crisp details and fast material removal. 🛠️
For competitive carving or gallery-style jack-o’-lanterns, tools from brands like Seymour Carving Tools and Dremel are staples. A professional setup includes V-gouges, spoon gouges, loop tools for shaving rind, and a reliable rotary tool with variable speeds. An Orange Wheel sanding attachment smooths edges and blends carved surfaces for a polished glow. These tools let sculptors work in gradients, not just silhouette cuts, enabling effects such as cheek contours, eyelid depth, and textured fur or woodgrain.
Use cases: a neighborhood competition where the pumpkin must hold structural integrity overnight; choose a thicker-walled pumpkin and pre-plan internal supports. If the final display needs photography, thin the wall in zones to permit controlled translucency — a shout-out to the pumpkin shading techniques often covered by the Pumpkin Lady. Referencing template sites like Pumpkin Nook for complex patterns helps transform flat templates into 3D sculptures.
Limitations and recommendations: a Dremel speeds work but generates dust and heat; use a mask and ventilate the workspace. Bit selection matters: coarse bits remove material quickly but can tear edges; diamond bits allow micro-detailing. Expect price variance: starter rotary tool kits run $50–$100, while pro-grade kits and replacement bits push $150+. Prime availability spikes in September and October, so plan purchases earlier to avoid backorders. For tools and tutorials, editorial roundups like BestProducts offer side-by-side comparisons of hand kits versus power tools.
Real scenario: if prepping for a neighborhood display with wet weather predicted, carve deeper reliefs that read well with lamps and use waterproof sealers under a covered porch. If hosting an evening contest, include spare batteries and a few Williams Sonoma-style tea lights or LED devices to produce consistent glow during judging. For texture-heavy pieces—think Zombie Pumpkins or horror motifs—use loop tools for grooves and V-tools for crisp teeth and bone edges.
Pro tip: practice on small gourds to master pressure and bit control before scaling up. Keep a repair kit: spare bits, extra LED lights, and a small bottle of vegetable oil to smooth cuts for cleaner photos. The investment returns when carvings withstand weather and light reliably during weekend-long Halloween trails.
To read Fake Glass Shards Halloween Safe Props
Final insight: advanced tools unlock dramatic results but require planning, safety, and practice to translate skill into show-ready pumpkins. 🔧
4. 4. Templates, Stencils & Printable Patterns — Endless Ideas and Sources
Opening (50 words): Templates and stencils transform an idea into a crisp jack‑o’‑lantern without freehand stress. Choose between press‑and‑carve sheets, printable PDF stencils, or reusable vinyl masks depending on desired detail and repeatability. Patterns range from classic faces to licensed characters and intricate scene stencils. 🖨️
High-quality sources of printable patterns include Pumpkin Pile, which hosts hundreds of free templates, and Pumpkin Lady, which blends technique tips with curated stencils. For printable and trendy designs, explore Artsy Dee and Monday Mandala. For themed packs—retro decades, Universal monsters, or silly faces—commercial kits like Pumpkin Masters and specialty sheets are convenient. For step-by-step inspired carved designs, Real Simple and HGTV show photographed examples with scaling tips.
When choosing a template, consider pumpkin curvature and scale. Templates that work on flat surfaces may distort on rounded pumpkins; use a tape measure to scale patterns proportionally. A common method: print at 75–120% size depending on pumpkin size and test-fit on a paper-wrapped pumpkin to preview placement. Press‑and‑carve stencils with adhesive backing eliminate transfer steps and are especially handy for small children or quick front-porch setups.
Printable template sources sometimes specialize in styles: some sites emphasize cute painted pumpkins (see Neuchcup painted pumpkin designs), while others curate horror-ready stencils for Zombie Pumpkins and macabre scenes (Neuchcup carving ideas). For themed tutorials—like Beetlejuice-style striping or layered faces—check specific guides such as Beetlejuice pumpkin tutorial that include step photos and paint pairings.
Adaptation tips: for intricate templates, partially remove rind by scraping depth lines first to create shaded tones rather than full cutouts. That technique suits templates designed for shadow play, like the Sensational Shadows pack. For repeated displays across a block, laminate templates and use binder clips to secure to pumpkins during tracing; this preserves pattern integrity through multiple uses.
Final insight: a great template multiplies creativity — the right stencil turns a nervous beginner into a confident carver, and the right printable can inspire seasonal displays that scale from porch clusters to front-yard installations. Save templates to a digital folder for next year. 📁
To read Broken Mirrors Halloween Special Effect
5. 5. Hosting a Carving Party & Pumpkin Care — Setup, Preservation, and Styling
Opening (50 words): Hosting a Carving Party is about flow: stations for scooping, stenciling, carving, and finishing trims. Plan seating, lighting, and a recipe station for roasted seeds and warm cider. Timing and preservation techniques keep carved pumpkins photogenic for longer. 🍽️🎶
Begin with staging: set at least three distinct areas — a messy scooping zone, a transfer/stencil zone with tape and pencils, and a carving station with task lighting. Include a post-carve display area for lamping and cooling. Recommended supplies include plastic drop cloths, plenty of paper towels, a sponge bucket for cleanup, and battery-operated LED lights for consistent glow. For music and atmosphere, curated playlists from Halloween Haunters or classic compilations add immersive flair without overpowering conversation.
Preservation matters. Carved pumpkins last longer if kept cool and shaded overnight. A simple trick: spray interiors with a 50/50 mixture of water and white vinegar to slow mold growth, or store carved pumpkins in a cool garage. For formal displays that must last several nights, consider sealing cut edges with petroleum jelly or vegetable oil to reduce dehydration. When rain is forecast, move delicate or detail-heavy pumpkins under cover — wind-driven moisture accelerates deterioration. For longevity and photo-ready results, swap tea lights for LED lanterns that last throughout evening events and are safer for families.
Food and timing: Plan to begin carving 1–2 hours before sunset for optimal light reveal. Include a seed-roasting station with pre-rinsing bowls and simple seasoning options: olive oil, sea salt, smoked paprika. A small printed recipe card adds charm and encourages guests to take seeds home. For thematic cohesion, match cookie cutters and stencil motifs to costumes and porch decor — Martha Stewart-style coordinating displays are approachable with a few curated props and a pallet of orange, black, and metallic accents.
Common mistakes to avoid include starting with pumpkins that are too old (soft spots accelerate decay), overcrowding the work area, and underestimating time for detailed designs. For beginner parties, provide templates from Pumpkin Pile or printable packs from Artsy Dee to reduce setup time. For added fun, introduce a friendly contest with categories like Best Retro (Dig Those Decades), Scariest (Zombie Pumpkins), and Most Kid-Friendly.
Styling and aftercare: arrange a display with varied heights using crates, bales, and LED uplights. Reuse carved pumpkins as planters for fall mums after Halloween by hollowing and lining with a pot; this repurposes the pumpkin and extends its visual life. For recipe follow-ups and craft ideas, consult seasonal archives like Good Housekeeping and HGTV for curated tips.
Final insight: a smooth Carving Party balances safety, pacing, and creative options so that every guest leaves with a carved or painted keepsake and a roasted-seed snack. Plan, protect, and repurpose — and the event becomes an annual highlight. 🎉
Selected resources and inspiration: explore curated templates and kits at Pumpkin Pile, expert how-tos at Pumpkin Lady, and product roundups at BestProducts and HGTV. For painted pumpkin ideas and hacks, check a range of creative guides at Neuchcup painted pumpkin ideas, Neuchcup carving hacks, and themed tutorials like Beetlejuice pumpkin tutorial. Save these links and pin for later to organize templates and shopping lists. 🔖