Show index Hide index
- 5 Quick Setup Wins for a Show-Stopping Christmas Village Display
- 5 Clever Lighting & Ambience Tricks That Make Festive Lighting Pop
- 5 Budget-Friendly DIY Tricks for Miniature Houses and Seasonal Display
- 5 Layout and Arrangement Strategies to Maximize Display Arrangement
- 5 Storytelling & Character Tips to Make Your Holiday Decor Come Alive

5 Quick Setup Wins for a Show-Stopping Christmas Village Display
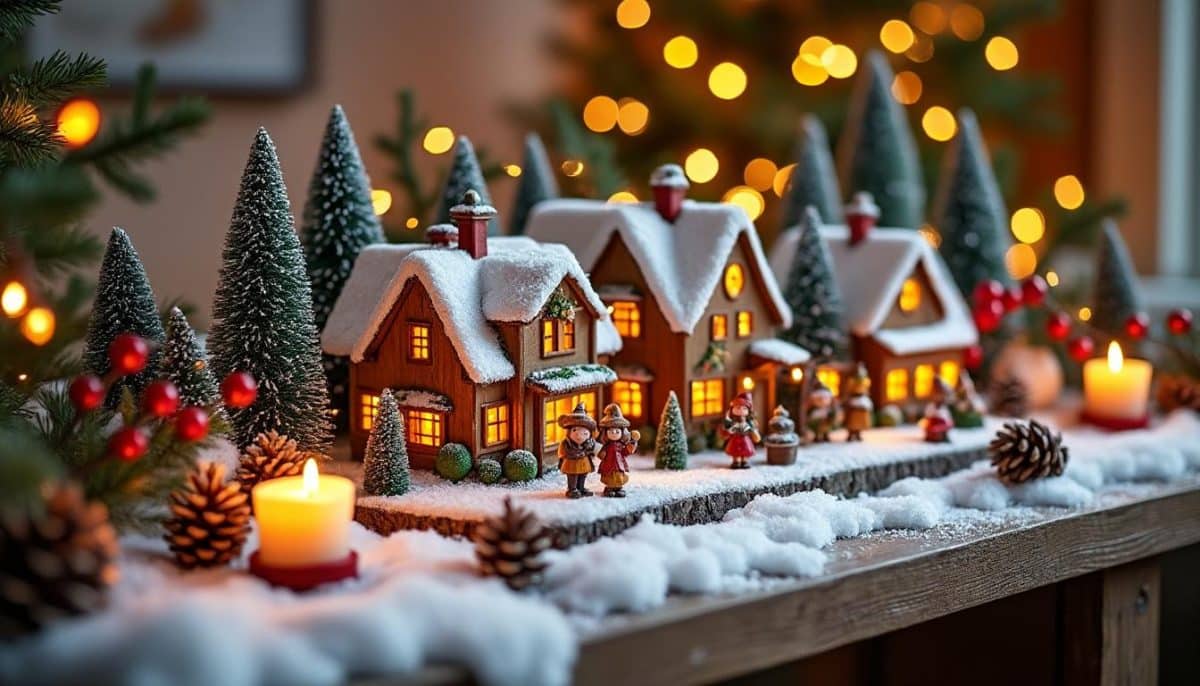
Start with a clear focal point and build outwards — establish a single anchor like a town square, nativity, or large lit church and place it center-front for immediate impact. This approach turns a collection of Miniature Houses into a cohesive Holiday Scene that reads clearly from across the room. For a fast win, select one element that will draw the eye and arrange everything else to support it.
Use elevation to create instant depth: stack two or three hardcover books under white fabric to form gentle hills so smaller pieces don’t get lost. This creates a multi-layered Village Setup that looks professionally staged without costly tiered shelving. Elevation lets lights shine through differently and prevents a flat, one-plane display.
Choose warm bulbs over cool white for cozy atmosphere — warm LEDs mimic candlelight and make your Christmas Village feel lived-in. Battery-operated string lights are an easy, cord-free solution that can be hidden under cotton batting and behind buildings for a soft glow. For specific lighting layouts and product ideas, explore practical inspiration on creative display ideas.
Set a base layer of texture first: pull cotton batting into wispy drifts to simulate fresh snow and tuck it into corners to soften edges. Cotton batting is clean, reusable, and creates realistic snowbanks that reflect light naturally. Pair this with small mirror tiles or foil under a “pond” area to fake ice — the reflection multiplies lights and visually enlarges the scene.
Group similar items in threes to create visual clusters that read quickly to the eye. Place three Miniature Houses together with two trees and a bench to form intimate vignettes, then repeat that rhythm across the display for harmony. This simple rule prevents chaotic scatter and ensures each area tells its own mini-story in the overall Display Arrangement.
Integrate vertical interest by alternating tall bottle-brush trees with low-profile cottages. This keeps sightlines varied and helps create natural pathways for the viewer’s gaze. For step-by-step staging ideas and advanced layouts, review curated suggestions at village display inspiration.
To read Christmas Ornament Crafts: DIY Projects for All Ages
Hide power sources: use battery packs behind larger buildings, and tuck cords under batting or fabric. The less visible hardware, the more immersive the Holiday Decor feels. Small, timed string lights (set to six hours) create nightly ritual without daily fuss.
Practical cost-savers: repurpose matchboxes painted as cottages or upcycle jars into lanterns for ambient pockets of light. A detailed DIY guide that shows similar budget tactics can be found at DIY Christmas Village Displays. These hacks multiply charm while keeping the build under a realistic budget.
Final quick tip: photograph the setup in low light to see where extra lighting or shadow smoothing is needed. The camera reveals imbalance faster than the eye. Pin this idea for later — Pin for later! 📌
5 Clever Lighting & Ambience Tricks That Make Festive Lighting Pop
Light placement defines mood — put warmth near windows and cool accents at the back. Prioritize warm white LEDs for window glow and street lamps, and reserve subtle cool-blue underlighting for ponds or ice rinks to mimic reflective ice. This contrast helps each element read correctly and enhances the perception of real materials.
Layer multiple light sources: place a timed string of 20–25 LED bulbs behind buildings for backlight, tuck a second string under batting for underglow, and add single battery tea lights in key houses for interior warmth. The layered approach produces depth without overpowering any single miniature item. For more lighting techniques and placement diagrams, see practical decoration tips at decoration tips.
Use reflective surfaces strategically. Mirrors create instant ponds or lakes; a shallow mirror dusted with fake snow reads as frozen water and multiplies surrounding lights. Placing a mirror under a central tree or plaza adds dramatic sparkle and draws attention to the heart of the Seasonal Display.
Consider scale when lighting: tiny LEDs and micro-string lights (20–25 bulbs) work best with Miniature Houses, while larger bulb strings can overpower the scene. Battery-powered micro-LEDs often include a timer function — set daily cycles to conserve batteries and create nightly magic with zero fuss.
To read Christmas Cracker Toffee: Addictive Recipe to Try
Hide batteries behind risers or in hollowed-out boxes beneath the base cloth. Concealment keeps the scene immersive and prevents visual clutter. If outlets are available, thin LED strip lights placed under the front edge of shelves create a soft halo that makes cotton snow shimmer without visible wiring.
Try DIY lanterns: fill small mason jars with fairy lights and a little fake snow to create street lamps and window props. These mason jar lanterns add pockets of glow that scale with average Miniature Houses and look excellent clustered near benches and market stalls. For creative mason jar ideas and craft inspiration, review community examples at Christmas village display ideas.
Animated lights and subtle movement add wonder but should be used sparingly. One rotating carousel or blinking shop sign creates focal excitement without overwhelming quiet vignettes. Place moving elements near family-traffic areas to catch attention and spark conversations.
Light color temperature matters: always test bulbs in the final dim environment rather than under room lights. Warm LEDs read warmer in dim light than in bright rooms, so test after dusk for best results. Final insight: balanced layers of warm interior light, soft backlighting, and reflective surfaces create a believable, enchanting Holiday Decor glow. ✨
5 Budget-Friendly DIY Tricks for Miniature Houses and Seasonal Display
Transform everyday objects into charming Miniature Houses — matchboxes become cottages, mason jars become lanterns, and cardstock builds quick storefront facades. These affordable conversions keep the Christmas Decorations personal and pocket-friendly while producing high-impact visuals.
Matchbox cottage method: remove the inner tray, flip it to form a roof, glue to the outer sleeve, and paint with acrylics. Add tiny painted windows with a dot of yellow behind each to simulate interior lighting. This simple craft delivers an instant collection of tiny houses at near-zero cost. For detailed step-throughs and variations, check examples and approaches at mastered village displays.
Styrofoam hills and glossy ice rinks are quick to make: carve foam sheets with a utility knife to create slopes, stack and secure with wooden skewers, then paint with white and a gloss medium for reflective ice. These materials are lightweight and easy to reposition across the display.
To read Christmas Table Decor: Create a Stunning Holiday Setting
Pinecone trees add natural texture: paint pinecones green, dust with white paint for snow tips, and add a touch of glitter while the paint is wet. Group varying sizes for realistic forest edges. These cost-free pieces create a rustic, handcrafted vibe that pairs well with both modern and vintage Miniature Houses.
Mason jar lanterns are another wallet-friendly upgrade: add fairy lights and fake snow, tie twine around the rim, and position as street or garden lights. Mixing jar sizes creates an engaging rhythm of glow throughout the Seasonal Display. For additional beginner-friendly DIY ideas and tutorials, explore DIY Christmas Village Displays.
Repaint and repurpose older or thrifted village pieces. A quick color update using acrylic paints and a matte sealer immediately modernizes dated buildings. Swap roofs, add tiny wreaths of craft foam, or glue miniature beads to simulate snowy eaves. These small moves refresh your collection without full replacement.
A simple supply list keeps projects efficient: cotton batting (1–2 rolls), 2–3 battery string lights, a handful of mason jars, white and blue acrylic paints, glue gun, a few foam sheets, and a box of assorted miniature figurines. Keeping this kit organized saves time and makes seasonal assembly swift and repeatable year after year.
One homeowner’s case study: Nora from a neighborhood craft group rebuilt a 24-piece display using only recycled boxes, cotton batting, and LED micro-lights. Her cost: under $30. The outcome: a layered village that drew compliments at a holiday open house. Small, deliberate investments create the largest perceived value in Holiday Decor. 🎄
5 Layout and Arrangement Strategies to Maximize Display Arrangement
Design for the viewer’s path — place the most detailed scenes where people naturally stop. Anchor high-traffic viewpoints such as mantel center, console tables near the entryway, or eye-level shelves. This ensures the most intricate vignettes get noticed and admired.
Varying heights eliminates monotony: use risers under cloth to simulate hills, place tall elements at the back, and keep foreground details small and intimate. This creates forced perspective where the village looks larger and more populated than it actually is.
To read Whimsical Christmas: Playful Decoration Style
Build a town square to serve as the focal hub; surround it with shops, benches, and a tree for a warm community vibe. The square becomes the organizing principle for the rest of the Village Setup and simplifies decisions about where to place figurines and pathways.
Design clear visual pathways within the scene for the eye to follow. Use a line of tiny street lamps or a string of lights to create implied walkways. This helps viewers explore the Holiday Scene naturally and discover details rather than scanning randomly.
Mix scales intentionally: pair one large building with several small cottages to suggest distance. This technique retains realism and adds sophistication to compact displays. For layout inspiration that balances scale and style, consult varied approaches at 17 charming display ideas.
Use backdrops for added depth: a painted cardboard mountain range or a printed starry sky stretches the perceived boundary of the scene. Backdrops are inexpensive and dramatically shift the mood from tabletop to sweeping landscape.
Consider multi-level shelving for limited spaces; each tier functions as a mini-neighborhood connected by visual themes like matching tree types or unified lighting. Shelving also simplifies storage and swaps during the season. For portable and small-space strategies, visit practical how-tos at how to display guides.
One practical example: a kitchen island installation used three shelf heights and mirrored base pieces to simulate a valley with a frozen lake, resulting in a display that felt twice the size. The insight: deliberate, layered arrangement transforms modest collections into memorable displays. Save for reference! ⭐
5 Storytelling & Character Tips to Make Your Holiday Decor Come Alive
Populate the scene with characters that tell a story — carolers at the town square, a family skating at the mirror pond, a vendor at the market stall. Narrative-rich displays invite viewers to linger and create emotional connection with the Christmas Village.
To read Christmas Home Decor: Room-by-Room Styling Guide
Choose a recurring character or mascot to guide the narrative across vignettes. For example, “Mrs. Ellis,” the fictional baker, appears by the gingerbread bakery one year and later at a market stall the next. This creates continuity and gives each setup a thread to follow.
Use props to suggest activities: tiny sleds near slopes, wrapped packages at doorsteps, or a bench with a dropped scarf hint at everyday life. These micro-details encourage discovery and make the seasonal tableau believable.
Mix static figures with one or two animated elements to create dynamic interest. A single moving carousel or slow-rotating windmill keeps the eye moving without overwhelming quiet scenes. Balance motion with stillness for maximum charm.
Create mini narratives for guests to find: a “lost puppy” bench scene, a “late-night caroler” near the church, or a “market bargain” corner. These small vignettes create conversational moments and make the display memorable.
Document and change a single element annually to build tradition. Move the mascot character to a new spot each year and photograph the progression. This practice makes the display an evolving story that family and friends anticipate.
For more story-building ideas and seasonal styling advice, the curated gallery at inspirational village showcases supplies visuals that help plan each narrative beat.
Close each vignette with a small, intentional ending: a warmly lit window or a tiny wreath on a door signals completion and provides emotional closure for the viewer. That final cozy detail is the secret ingredient that makes holiday displays feel like home. 🎁