
Show index Hide index
- 5 Ways to Create a Cozy Cabin Vibe: Quick Essentials for Rustic Christmas Decor
- Problem: The ‘Too-Perfect’ Holiday Look vs. Cabin Warmth
- Solution: Five Actions That Transform a Space
- Examples & Sources
- 5 Rustic Texture Techniques to Layer Natural Materials for a Cabin-Style Christmas
- Problem: Texture Without Clutter
- Solution: Practical Techniques with Measurements and Costs
- Examples and Pro Tips
- 5 Ways to Light a Cabin Christmas: Candles, Lanterns, and Warm String Lights
- Problem: Harsh Light vs. Cozy Glow
- Solution: Practical Setups and Safety Tips
- Examples & Product Notes
- 5 Budget-Friendly DIY Projects That Actually Work for Rustic Cabin Christmas
- Problem: Limited Budget and Time
- Step-by-step Projects with Costs and Time Estimates
- Examples and Links for Tutorials
- 5 Staging and Sourcing Strategies: Where to Buy, What to Thrift, and How to Arrange a Cabin Christmas
- Problem: Where to Spend vs. Where to Save
- Sourcing Strategy & Timeline
- Examples & Case Study


5 Ways to Create a Cozy Cabin Vibe: Quick Essentials for Rustic Christmas Decor
Opening (50 words): Fast, portable tips to turn any living room into a cabin-worthy holiday retreat. Start with natural textures, warm lighting, and a single unifying color story to avoid clutter. These steps work whether the room has exposed timber or a neutral modern shell. Pin for later! 🎄
Answer: Rustic Christmas Decor: 5 Ways to Create a Cozy Cabin Vibe
The best Rustic Christmas Decor are: layered natural textures like burlap and jute, evergreen garlands with warm string lights, thrifted wooden pieces (sleds, crates), hand-crafted ornaments (wood slices, cinnamon-wrapped mason jars), and strategic soft lighting from lanterns and LED candles. These elements solve the problem of sterile holiday styling by introducing tactile warmth and lived-in charm.
Why these solve the specific problem: modern homes often feel too polished for cabin nostalgia. Natural materials and lived-in pieces add depth, hide imperfections, and create a warmth that bright lights and metallics cannot. The result is a home that feels welcoming to family and guests while still being effortless to maintain. 😊
Quick Answer (100 words): Focus on five repeatable actions: (1) anchor the room with a jute or woven rug, (2) layer plaid throws and pillows, (3) drape warm string lights through fresh or faux garlands, (4) display a small collection of vintage wooden pieces like sleds or crates, and (5) use DIY ornaments made from wood slices and cinnamon for scent and texture. A mix of a few sourced items from Pottery Barn or West Elm with thrifted finds creates authenticity without blowing the budget. Save for reference! ✨
Deep Dive (approx. 300 words):
To read Christmas Table Decor: Create a Stunning Holiday Setting
Problem: The ‘Too-Perfect’ Holiday Look vs. Cabin Warmth
Holiday staging often leans toward symmetrical, minimalist designs that read as commercial. That look can feel cold in a space that should invite lingering and conversation. The fix is intentional imperfection—items that look like they’ve been collected over seasons rather than placed for a catalog shoot.
Start by choosing a single anchor—either a large woven rug or a cozy sofa in neutral tones. A neutral sofa allows quick seasonal refresh with plaid cushions or a red throw from Crate & Barrel or Anthropologie without disrupting year-round decor.
Solution: Five Actions That Transform a Space
Layering is the most efficient method. Pick three textures—wood, knit, and metal—and repeat them across the room. A wooden sled above the mantel, a knitted stocking with leather patches on the back of a chair, and a tin lantern by the window create a cohesive scene.
An inexpensive DIY that works every time: wrap a mason jar with cinnamon sticks and tie with twine; place an LED candle inside for safe, scented ambiance. The small cost and five-minute assembly make this a high-impact, low-effort decorative win.
Examples & Sources
For inspiration and practical layouts, refer to curated photo essays that show how textures interact in real cabins. Useful resources include a roundup of rustic projects at thewowedit and step-by-step cabin styling ideas at designeraffair. These help translate the concept into actionable shopping lists and setup photos.
Final insight: Start with texture and light; decoration is just the finishing touch. ✨
5 Rustic Texture Techniques to Layer Natural Materials for a Cabin-Style Christmas
Opening (50 words): Layering textures is the backbone of a convincing cabin holiday. Begin with a wood base, add textiles, bring in greenery, and finish with small metallic or ceramic accents. Each layer must be tactile and affordable. Pin for later! 🌲
To read Whimsical Christmas: Playful Decoration Style
Answer: The best texture techniques for Rustic Christmas Decor are: wood grounding, knit layering, burlap accents, fresh greenery, and mixed-metal highlights. These techniques solve the common problem of flat, one-dimensional holiday decor by building depth and visual interest.
Why these solve the specific problem: Homes with white walls or modern furniture risk looking staged during the holidays. Natural textures create focal points and hide seasonal clutter. They also support handheld DIY projects like wood-slice ornaments and pinecone garlands, which add personality and hand-made warmth.
Quick Answer (100 words): Use three texture bands: heavy (wooden sleds, log slices), medium (chunky knit throws, woven baskets), and light (burlap ribbons, twine-wrapped jars). Place heavy textures low and centrally—on floors or hearths. Position medium textures on furniture surfaces. Reserve light textures for accents on mantels and shelves. This approach ensures balance and prevents over-decoration. For step-by-step visuals and affordable DIY ideas, check resources like artandcraftdiy and ideasbyemery. 🎁
Deep Dive (approx. 350 words):
Problem: Texture Without Clutter
Adding texture can easily become clutter if every surface gets covered. The solution is zoning: choose three display zones—entryway, mantel, and coffee table—and vary textures intentionally across those areas. That prevents visual chaos and concentrates sensory impact where it matters most.
For the entryway, a bench draped with a plaid blanket and a basket of pinecones creates a welcoming vignette. For the mantel, a long evergreen garland with warm LED string lights and a few wood-slice ornaments keeps things low and linear, preventing a top-heavy feel.
Solution: Practical Techniques with Measurements and Costs
Technique one: Wood grounding. Use a small wooden sled (approx. 36 inches wide) or a stack of firewood next to the hearth as an anchor. Sleds can be found for $30–$100 at flea markets or sourced from stores like Restoration Hardware for a pricier, aged look.
To read Christmas Prints: Downloadable Art for Your Home
Technique two: Knit warmth. Add a 50×60 inch chunky knit throw folded over the sofa arm. Throw pillow sizes of 18×18 inches in tartan or neutral tones complement the throw. Expect to spend $20–$80 depending on materials and brands like Pottery Barn or Kirkland’s.
Technique three: Burlap and jute ribbons on stair rails. Use 2–3 inch burlap ribbon and secure with small pinecone clusters every 18–24 inches for rhythm and repetition. This costs under $15 for 10 yards of ribbon and transforms stairways instantly.
Examples and Pro Tips
A case study: Anna, a hypothetical cabin owner, paired a jute rug with red tartan pillows and a 36-inch sled above the mantel. The sled anchors eye level while the pillows invite seating. Anna sourced small evergreen trees and burlap from a local market and combined them with glass baubles from Williams Sonoma for a subtle upscale touch.
Pro tip: Repeat a single accent color (red or deep green) in three spots to create cohesion. Repeat material textures in odd numbers—three wood elements, five knit textures—to keep the eye moving.
Final insight: Textures must serve a purpose—comfort, scent, or story—to make a space feel truly cabin-like. 🌟
5 Ways to Light a Cabin Christmas: Candles, Lanterns, and Warm String Lights
Opening (50 words): Lighting defines atmosphere. Opt for warm LEDs, vintage-inspired lanterns, and candle-groupings to create a flicker-rich environment that reads as intimate and lived-in. Avoid bright cool-white bulbs that flatten textures. Pin for later! 🕯️
Answer: The best lighting strategies for Rustic Christmas Decor are: layered lighting with warm string lights, vintage tin lanterns with LED candles, mason jar candle clusters, antler-inspired candle holders for centers, and strategic accent lamps to highlight artwork or wood grain. These methods solve the problem of harsh overhead lighting and transform rooms into cozy nooks.
To read Christmas Living Room: Transform Your Space for the Holidays
Why these solve the specific problem: Overhead lights kill texture and cast flat shadows. Layered, low-level lighting creates pockets of warmth where people naturally gather—on sofas, near dining tables, and beside reading chairs—so the space feels intimate and cabin-like without being dim or unsafe.
Quick Answer (100 words): Start with warm string lights (2700K) draped through garlands; add vintage tin lanterns with LED candles near windows; create groups of three mason jar lights on tables; use an antler-style candlestick as a dramatic centerpiece; and place a soft-glow floor lamp behind a sofa for reading. Brands like Magnolia Market and Terrain carry great lanterns; for budget options, check Kirkland’s or Pier 1 Imports-inspired finds. Remember to test candle arrangements for safety and keep pathways clear. 🔥
Deep Dive (approx. 350 words):
Problem: Harsh Light vs. Cozy Glow
Modern overhead lighting often washes out holiday hues and wood grain. To achieve a cabin glow, transition to a multi-source approach. Low-level light reduces glare and amplifies texture—exactly what rustic decor needs.
Consider swapping a single bright bulb for dimmable options or adding a smart bulb with warm presets. This simple change makes all other decor decisions more forgiving.
Solution: Practical Setups and Safety Tips
Setup one: Mantel glow. Run a strand of warm LED lights (5m) through an evergreen garland and tuck in pinecones for texture. Use LED lights to prevent heat build-up on fresh greens.
Setup two: Window vignette. Place a vintage tin lantern with an LED candle on the sill. Frame it with small miniature evergreen trees for height. This creates a welcoming curbside glow visible from outside.
To read Christmas Tablescapes: Beautiful Table Settings
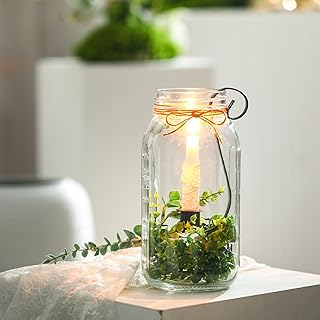
Setup three: Table groupings. Cluster three mason jars wrapped with cinnamon sticks and placed on a wooden slice. Use flameless tea lights for safety—this combo offers scent and focal presence without fire risk.
Examples & Product Notes
For durable options, Restoration Hardware offers heavy metal lanterns that work well in high-traffic cabins. For trend-forward, Anthropologie and West Elm have decorative candlesticks that combine rustic forms with modern finishes. Williams Sonoma carries an assortment of LED candle sets that mimic real flicker; they are useful for mantels where real candles would be risky.
Pro tip: Always keep a clear path to exits and never place candles where they can tip from pets or children. Use adhesive candle anchors for added stability on mantels and tables.
Final insight: The right light is intentional and layered—swap one overhead source for multiple low-level options and the room instantly feels more like a cabin. 🕯️
5 Budget-Friendly DIY Projects That Actually Work for Rustic Cabin Christmas
Opening (50 words): DIY brings personality and saves money. Choose projects that use easily sourced materials—pinecones, wood slices, burlap, twine—and take under one hour each. These items lend authenticity and scent to a space. Save for reference! 🛠️
Answer: The best DIY projects for Rustic Christmas Decor are: wood-slice ornaments, pinecone garlands with fairy lights, burlap ribbon stair accents, cinnamon-wrapped mason jar candles, and converted metal buckets filled with greens. These projects tackle the problem of expensive ready-made decor by delivering high-impact visuals for modest cost.
Why these solve the specific problem: Purchased holiday decor can look mass-produced. DIY allows for unique imperfections and ties the room together with handcrafted charm. Plus, most materials are seasonal and affordable, keeping budgets in check while driving big visual returns.
Quick Answer (100 words): Collect fallen branches for wood-slice ornaments; sand and burn initials or simple motifs. String pinecones on twine and weave in fairy lights for a mantel garland. Wrap mason jars with cinnamon and twine, insert LED tealights. Use a metal bucket, line with burlap, and fill with fresh pine for an instant porch display. Tutorials and budget tips can be found at neuchcup DIY budget guide and creative prompts at neuchcup Christmas aesthetic ideas. 🎨
Deep Dive (approx. 350 words):
Problem: Limited Budget and Time
Many want a curated cabin feel but face time and budget constraints. The solution is short, repeatable DIYs that can be assembled in batches. This permits consistent aesthetics without daily crafting sessions.
For example, wood-slice ornaments can be made in 30–45 minutes for a dozen pieces. A simple wood-burning pen, sandpaper, and a drill for the hanging hole are the only tools required.
Step-by-step Projects with Costs and Time Estimates
Project one: Wood-slice ornaments. Time: 30–45 minutes per dozen. Cost: $0–$15 if wood is gathered locally; $10–$25 if slices are purchased. After sanding, lightly burn a motif or paint a pine tree. Loop twine and hang.
Project two: Pinecone garland with fairy lights. Time: 20–30 minutes. Cost: $10–$20. Attach pinecones to twine at 6–8 inch intervals, weave a 5m strand of warm LED lights through the garland, and drape over the mantel.
Project three: Cinnamon-wrapped mason jars. Time: 5–10 minutes each. Cost: $1–$3 per jar. Secure cinnamon sticks with twine; add an LED tealight. This also provides subtle scent when warmed by sunlight or nearby lamp heat.
Examples and Links for Tutorials
For detailed inspiration, explore step-by-step galleries at artandcraftdiy and curated cabin projects at homedecorbliss. For countdown and advent builds, ideas at neuchcup’s countdown guide provide playful variations that include log-cabin-style advent calendars.
Pro tip: Batch make multiples of the same ornament to speed production and ensure cohesion. Use storage boxes labeled by room so setups are fast each season.
Final insight: Short, repeatable DIYs create a consistent cabin story while keeping costs and effort manageable. 🧶
5 Staging and Sourcing Strategies: Where to Buy, What to Thrift, and How to Arrange a Cabin Christmas
Opening (50 words): Staging and sourcing determine authenticity. Mix curated buys from Pottery Barn or Williams Sonoma with thrifted treasures and handmade pieces. Prioritize one statement item, then complement it with smaller, textured accents. Pin for later! 🛍️
Answer: Best staging and sourcing strategies for Rustic Christmas Decor are: buy durable anchors (rug, lantern), thrift one or two vintage wooden items (sled, crate), DIY small accents, repeat a color story across seating and tree, and limit metallics to one finish. These strategies prevent overbuying and create a cohesive, layered cabin look.
Why these solve the specific problem: Many shoppers either overspend on trendy pieces or end up with mismatched decor. A hybrid approach—quality anchors, thrifted patina, and DIY scent/textures—achieves high-end warmth without the price tag. The result reads like a collected, lived-in cabin rather than a store display.
Quick Answer (100 words): Choose a statement anchor—like a woven jute rug from Terrain or a heavy tin lantern from Restoration Hardware. Thrift a wooden sled or crate for character. Use shopping resources and mood boards to plan 45–60 days ahead. For staging tips and run-throughs, see cabin-focused guides at stylishcabins and romanticizingrachel. For affordable alternatives and DIY guides, consult neuchcup tree bows styling and neuchcup budget DIY. 🎯
Deep Dive (approx. 350 words):
Problem: Where to Spend vs. Where to Save
It’s tempting to buy everything new, but that leads to a look without history. Invest in two to three high-impact, reusable pieces—rugs, lanterns, or a heavy wooden table—from stores known for durability like Restoration Hardware, Pottery Barn, or Crate & Barrel.
Save on decorations that benefit from DIY charm: ornaments, garlands, and small tabletop vignettes. These are inexpensive to make and can be refreshed yearly for minimal cost.
Sourcing Strategy & Timeline
Plan purchases 45–60 days before the season to avoid rush pricing and sold-out items. Early shopping allows for combining a few investment pieces from Williams Sonoma or West Elm with thrifted finds from local markets or Pier 1 Imports-style vendors.
Staging should be done in three passes: anchor placement, textural layering, and accenting. First, place the rug and major furniture. Second, layer throws and pillows. Third, add small accents—wreaths, stockings, and candles. This phased approach streamlines decision-making and prevents over-decoration.
Examples & Case Study
The fictional homeowner Anna chose a heavy jute rug from Terrain and paired it with a secondhand wooden sled found at a flea market. She invested in three tartan pillows from Magnolia Market and filled metal buckets with fresh pine for the porch. The resulting space felt curated and collected.
For further inspiration on balancing sourced and thrifted items, check curated galleries at homedecorwoodworking and styling tips at withlovelive. Additional shopping prompts and themed ideas are available at homemadegraceful.
Final insight: Spend on longevity, thrift for story, DIY for soul—then edit ruthlessly for a cabin-ready holiday that feels timeless. 🎁